|
|
This section provides information about performing administrative functions. For more information about administrative functions, see the Winshuttle Workflow Administrator Guide.
Out of office delegations allow you to automatically assign your in-coming assignments to another member of your team when you are out of the office. This allows you to maintain uninterrupted execution of your company’s business processes.
You can create multiple out of office delegations to automatically reassign your assignments from different workflows to other team members. Assignments will be delegated based on matching the criteria of a delegation.
For example, assignments matching criterion A are routed to John, assignments matching criterion B are routed to Lisa, assignments matching criterion C are routed to Bill, and assignments not matching any criterion are routed to Mary.

The Winshuttle Process List Detail View appears.
NOTE: The user must be a member of the group that has access rights to the SharePoint site you are working with.
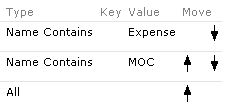
NOTE: Assignments are delegated based on matching the criteria of a delegation listing. If you have multiple delegations, they are evaluated from the top down. You can sort the stacking order of multiple delegations by using the corresponding arrows next to each listing.
TIP: Add a generic delegation at the end of your Delegations List to catch any tasks that do not match the criteria of your other listings.
The Winshuttle Process List appears.
The Out of Office Delegations window appears.
The Winshuttle Process List appears.
The Out of Office Delegations window appears.
Bulk Reassignments enable you to reassign all of one person’s assignments to another person. This can be done for a single task (to accommodate departmental restructuring for example) or for all tasks (to accommodate someone leaving the company), allowing you to maintain continuity and efficiency in workflows while minimizing downtime.
NOTE: To perform this function you must either be logged in as the Winshuttle Administrator or have the permissions specified in the BulkReassignmentPermissionSets Configurator key.
The Winshuttle Process List appears.
The Winshuttle Bulk Reassignment window appears.
The Winshuttle Bulk Reassignment Select and Confirm window appears.
The selected assignments and processes are updated with the new user assigned to them.