Web Help
|
|
 Home
Home Back
Back Forward
 Contents
 Index
Index Product Help
 Support
 Print
Print Feedback
|
Back to |
Mapping
In the mapping stage of the query process, you map the fields of your query to the columns of your output file. Each column header corresponds to a field. QUERY provides easy drag-and-drop editing of fields. Output options in QUERY include Microsoft Excel, Microsoft Access, and XML files.
You can map the fields of any data source available to QUERY.
The map pane before a query file is mapped. Click Create Mapping to map manually or click Auto Mapping to automatically map all the query fields.
In the mapping stage of the query process, you map the fields of your query to the columns of your output file. Each column header corresponds to a field. RUNNER provides easy drag-and-drop editing of fields for queries that are already mapped.
To change query mapping
- In the Mapping pane, click Update query mapping.
Mapping fields manually
To map fields manually
- From the Map pane, click Create mapping. The Mapping screen appears, including the query field form and the empty preview of the results file.
- Drag fields down from the form to the file preview area in the order you want.
- From the Map pane, click Update mapping. The Mapping screen appears, including the query field form and the preview of the results file.
- Drag fields down from the form to the file preview area in the order you want.
Auto map query fields to a data file
To map fields to an existing or new data file from the map pane (Excel or Access)
- From the Map pane, click Auto Mapping.
The Auto Map File dialog box appears.
- Specify the type of destination file for the data, whether Access or Excel.
- Do one of the following:
- To create a new file, specify the path and name of the file.
-or-
- To map the data to an existing file, click the folder icon
 to locate the file. Click OK.
You can use Auto Mapping to automatically map all data fields in the query file to Excel worksheet columns or Access database fields.
To auto map query fields in the mapper (Excel or Access)
- In the mapper, click AutoMap.
The fields are automatically arranged in the result preview form.

The AutoMap button as it appears in the Mapping pane.
The result file preview
The result file preview consists of columns or rows into which you drag fields. With this form, you can see how your output file will look.
To change the type of output file
- Click Change Destination Type
 . Click Excel, Access, XML, or Text.
The query field form
S. No |
Row ID or sequence of fields for output |
SAP field name |
SAP name, usually a German acronym or abbreviation |
Expression |
The table name and field name |
SAP Field Description |
A description in English of the contents of the field |
Field Type |
Byte, decimal, integer, string, date or time |
Field Size |
Number of characters in the field contents |
Padding |
Controls automatic padding for numeric values of the string fields. Note: If you compare non-numeric data without padding, QUERY may return unexpected results. |
Mapped to Column |
The letter of the output column to which a field is mapped. Available for Microsoft Excel and Microsoft Access |
Fields that apply only to Excel |
|
Excel Expression |
The excel formula you want to apply on corresponding field |
Expression evaluation cell |
The cell which will be used for interim calculations of excel formula |
Transform original mapping |
Option to overwrite the original data with transformed data |
Expression evaluation description |
Relevant header description for the evaluation cell |
Mapping headers
To map fields to Excel column headers
Drag each selected field and drop it under a column header in the output file.
To map fields to Access tables
- Drag each selected field and drop it under a column header in the output file.
- Click Add Log Column (optional)
 to add a column into which the SAP log data can be written.
To modify fields in an Access table
- To change the name of a field, right-click the field, and then click Rename.
- To change the name of the table, right-click the Table tab
 .
.
To map fields to XML files
- No preview file exists for XML files, and you cannot preview or map results.
Transforming data before the download
By using Excel formulae during mapping stage, you can transform data before downloading it. This feature is available only when the destination type is Excel.
- Click Update Mapping on the Mapping pane.
- For the field whose output you want to transform, find the Excel Expression column, and then enter the Excel formula. In the example below, a formula is entered for the field GROSS WEIGHT. This formula will be applied to GROSS weight values that start from cell G2 and resultant value will be stored in column H from cell H2 onwards till the last record extracted. The cell H2 is mentioned in the expression Evaluation Cell (refer to step 4 below)
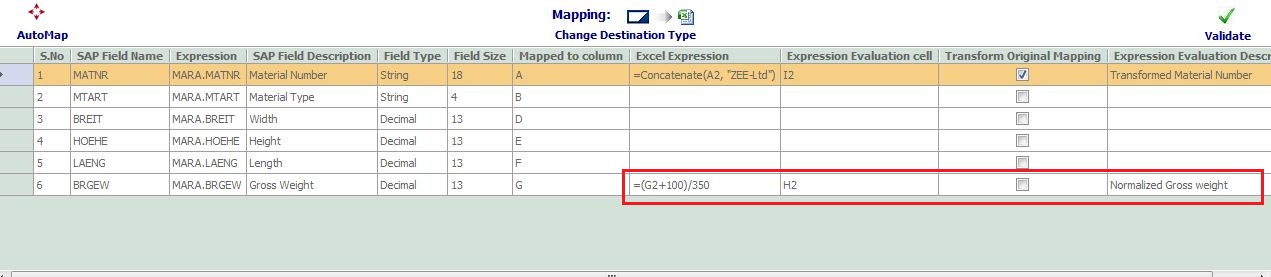
- Enter the appropriate Excel cell value in the Expression Evaluation cell. This cell will be used to evaluate the excel expression and place the transformed data. It is mandatory to enter this information. In the example mentioned in step 2, the transformed data will be written into the column H starting from cell H2.
- To validate the Excel formula, click Validate
 . Note that the validate option is supported only for formulae that are entered in English.
 - To choose to overwrite the original data with transformed data, select Transform Original Mapping. In the example below, the formula is applied to MATERIAL NUMBER and the transformed value is written back in column A.
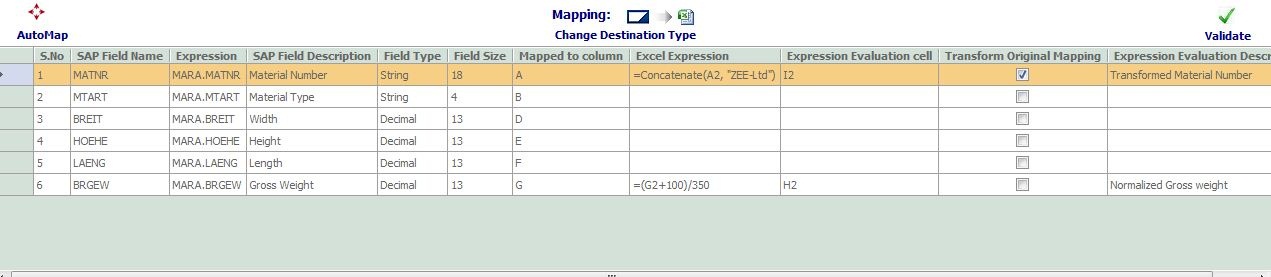
In this example, column I is used only for interim calculations and will be deleted after the calculations are finished.
Undo mapping
After selecting a particular destination type user can undo any step performed in mapping. The number of levels of undo is unlimited.
To undo mapping
- Press CTRL + Z.
|
Also in this section New Features in Winshuttle QUERY version 10.6/10.7 |
 Trademarks


