 Home
Home Help Center
 Support
 Print
Print Feedback
Using variants and deployment profiles
On this page
Deployment Profiles | Variants |
There may be times when you need to provide a different value for one or more parameters in different deployment profiles. You can do this by using variants.
What is a deployment profile?
A workflow solution can have one or more deployment profiles—for example, a Development profile for building and testing, and a Production profile for published solution.
When you publish a solution, the solution’s components will be published to their respective locations for the active profile. You can also configure a solution's properties for each deployment profile—these get replaced within workflow when the solution is published.
For example, as you work through the development process, you may have a deployment Profile for your development environment and one for your production environment. Once you have finished working in the Development Environment and you are ready to publish the Solution to the Production Environment, some of your variables (or variants) may change.
Data Connections are a good example of what will need to change when migrating a solution. A data connection usually connects to a data source inside the same environment in which you are working. But when you move the Solution from that environment (from staging to production, for example), that connection is severed.
With deployment profile variants you can have unique variable definitions throughout your Solution file without needing to change variables every time you move the solution.
How deployment profiles and variants work together
When a solution gets published, Designer updates the workflow, InfoPath, or any other solution component property values with any variant values that are defined in the active deployment profile.
Note: Designer 10.6.1synchronizes values and parameters between the active deployment profile and the solution. In addition, it provides an additional option to Copy values from a solution. See Workflow and Designer Release Notes for more information about Designer 10.6.1. The remainder of this section only applies to Designer 10.6.
When publishing a Winshuttle Solution in Solution Lifecycle Management (SLM) mode, note that the Active Deployment Profile takes precedence over whatever you may have configured. This means that if you have a data connection in a form, once you migrate to a new environment that data connection will break. But if you have created a profile variant for your destination environment within your Deployment Profile, the Workflow Engine will update all relative Data Connections with the new link to your data connection within the new environment.
It is important to review and update values in the active Deployment Profile, not in the workflow or InfoPath form, before publishing a solution.
If a property with variant values is in the workflow but not in the deployment profile—for example, if a SharePoint Site Properties value is changed in the workflow—then the changes will be disregarded and overwritten by the values in the active deployment profile. Any value changed in a workflow will not overwrite its respective variant’s value within an existing deployment profile.
Tip: If you want to have a deployment profile with the current values of your workflow, then create a new deployment profile. The default values for variants will be taken from the saved solution file.
Example: A company uses a deployment profile in a solution called "Deployment Profile for Server1". Someone changes a value in the solution’s properties—for example, a site or list, a swimlane user, or the SharePoint site—and then saves the solution. In this case, the changes saved in the solution will not affect the variants of the existing deployment profile "Deployment Profile for Server1", because they were saved in the solution and not the deployment profile.

To use the changes made, the user should either create a new deployment profile ("Deployment Profile for server2") or manually change the values in the existing deployment profile ("Deployment Profile for server1").
Deployment profile properties
Deployment profiles have the following features and properties:
|
|

Creating a new deployment profile
In the Designer Solution Tree window, right-click Development Profile, and then click New.
If you receive an error message, click Validate. Ensure that IsOverwriteAllowed is not set to false and that no script exists with the same name. |
|

Editing a deployment profile
In the Designer Solution Tree window, right-click the profile (for example, Development), and then click Edit. |
|

Deleting a deployment profile
In the Designer Solution Tree window, right-click the profile (for example, Development), and then click Delete. |
|

Setting an active deployment profile
In the Designer Solution Tree window, right-click the profile (for example, Development), and then click Set as Active. |
|

Note: There can be only one active profile at a time. If someone adds another profile, it must be set as active.
Configuring deployment profiles
The deployment profile configuration window has the following properties:
See below for additional information on changing variants. |
|

What is a variant?
With variants, you can specify values for parameters that depend upon the deployment profile.
For example: A solution using the Add Attachment plug-in could have a different value for the file parameter depending upon which profile is used. A Development deployment profile could use a value of D:\ for the drive location, whereas the Publishing deployment profile could use a value of C:\ for the drive location.
Variants can be applied to swimlane users, form data connections, plug-ins, workflow participant resolvers, and InfoPath controls.
Variants contained within a deployment profile
|
|
Changing variants
You can update all the variants that have the same value. If you change a variant value that applies to more than variant, a dialog box will warn you with the following message: "<<Number of Variant with same value>> variants also exist with the same value. Click Apply All to update those variants with value."
|
|

Changing multiple variants (bulk)
You can easily update multiple variants in a single click. From the Deployment profile dialog box, click Bulk Update. |
|

The Update Profile Variant dialog opens. Briefly, the options on this screen are as follows: Filter Type: You can filter your variants by: All, Status, Source, Name, or Value.
|
|

You will also see:
|
|

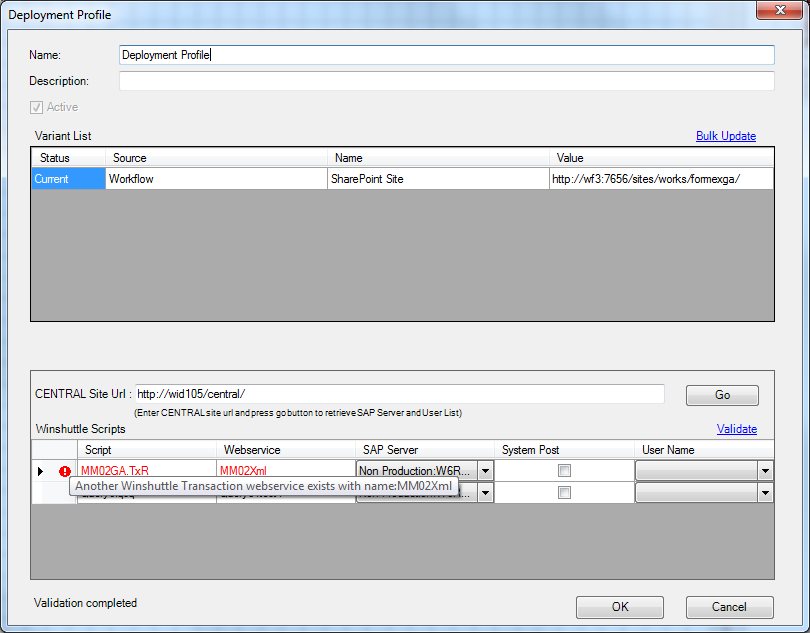
Mapping scripts to an SAP Server
If you are using Winshuttle Central in your environment, you’ll also see an additional section where you can map the Winshuttle scripts to an SAP server. This panel displays the following information:
- Central Site URL: Once user enters the Central URL and click Go button, designer will fetch all information metadata from central which required for publishing any scripts.
- SAP Server list: Select the SAP Server from dropdown list.
- System post: Check this option if script publish with System Post option.
- Users List (for system post): If System Post is checked then User Name list will be displayed on the basis of SAP server.
By default, the application uses the credentials for the logged-in Windows user to connect to the Central site. If you want to use different credentials, you can specify them under Tools > Options > Winshuttle tab.
Note: If you add a new SAP Server on a Winshuttle Central site, you can refresh the list of servers by closing the deployment profile user interface and then opening it again. open it again.
Winshuttle Scripts: All imported scripts (either Transaction or Query) are displayed in this section.
Validating script list data
If you want to verify all the properties corresponding to Winshuttle Scripts are correct and that scripts can be published successfully with those properties, click Validate. Any errors will be displayed in red. (see the example below).
 Trademarks