Applies to:
Migrating an LMS installation from one machine to another
On this page
The Winshuttle License Management System consists of 2 basic components:
- LMS Server: The LMS Server stores all information about connection strings to databases in its configuration files. If you migrate the LMS server to a new location, then you must update the LMS Server configuration files with new connection strings.
- Database Sever: The Database server stores all URLs. If you migrate the LMS Server to a new location, then the URLs in the Database Server must be updated in the database.
You can migrate one or both components from one environment to another.
Note:
- When LMS Server is migrated, changes must be made to the Database Server.
- When the Database Server is migrated, changes must be made to the LMS Server.
- If both are being migrated, both the LMS Server and Database server must be updated.
Custom host headers
The migration processes described on this page above assume your LMS implementation doesn’t contain a custom host header. After changing a machine name and/or migrating LMS to a new machine, the URLs are changing, and the URL changes are being handled by the LMS Installer. You can also use these same process under the following circumstances:
- When LMS Server uses Custom Host header
- When LMS is in a NLB (Network Load Balance) environment
- When the LMS Site and Services uses HTTPS
Migrating the LMS Server
Back to topUse the following process if you are migrating the LMS Server installation (only) from one machine to another.
Before you begin
Make a note of the following information
- The Database Server and Instance name. An example might look similar to this: CHA-EN-VSTCNXY\SQLEXPRESS
- The Licensing Database name. An example might look similar to this: WinshuttleLiceningDB
Contact Winshuttle Support to get the LMS utility.
Migrating the LMS Server
- Copy the LMS Installer to the Server machine to which LMS needs to be migrated.
- Run the LMS installer.
- Continue through the installation until you reach the Database Details screen.
- On the Database Details screen, click Browse, and then browse to and select the Database server and instance name where your current LMS Database is installed.
- On the Database Details screen, check Use an existing License database.
- In the Licensing Database Name field, type the name of the Licensing Database. Make sure it matches exactly.
- In the Reporting Database Name field, enter a new database name.
- Click Next and continue through the rest of the installation screens to complete installation.
Completing LMS Server migration with the LMS Utility
- Run the LMS utility as an Administrator.
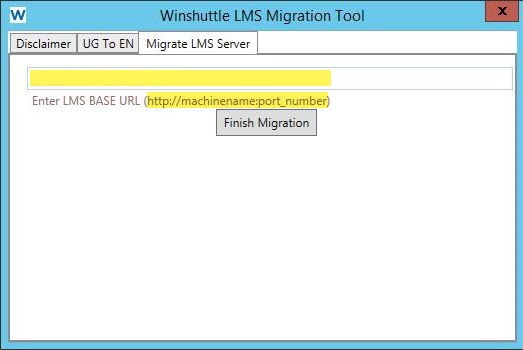
- Click Migrate LMS Server.
- Enter the new Base URL.
- Click Finish Migration, and then click Yes to confirm your LMS URL. (Click No to change the URL.)
- Click OK to have the utility recycle IIS.
Note: only the base URL is required; not the complete LMS URL. To get base URL remove the /Site part of the full LMS URL.

Note: Winshuttle also recommends manually recycling IIS after running the utility.
Migrating the LMS Database server (only)
Back to topThe following procedure assumes you have a backup of an LMS database and need to recover it to another database server.
Before you begin
You must have the following before you begin the process:
- You need a valid backup of your LMS Database
- A new Database Server with MSSQL Server of the same version or higher than the MSSQL Server from which the backup was taken.
Migrating the LMS database server
- Copy the LMS database backup on new Database Server
- On the new Database Server, create a database with the same name as the database server from which the backup was taken.
- Right-click the new database, and then click Tasks >> Restore >> Database.
- Select Device, and then click Browse.
- Click Add, and then select the backup file.
- Click Options.
- Check Overwrite the existing database (WITH REPLACE), and then click OK.
Verify a successful LMS database migration
You will now need to update the LMS Server with new connection strings so they point to the new database server instead of the old one.
The Connection Strings can be changed manually but this is not recommended. Instead, Winshuttle recommends:
- Uninstall the LMS (Run the LMS installer, and then select Remove).
- Re-install LMS on the new machine and using the migrated LMS database when entering the Database server information during Setup.
Migrating both the LMS Server and LMS database Server
Back to topBefore you begin
Make sure you have the following before proceeding:
- Make a note of the Database Server and Instance name (a typical value may look like CHA-EN-VSTCNXY\SQLEXPRESS)
- The Licensing Database name (typical value look like WinshuttleLicensingDB)
- A valid backup of the LMS Database
- A new Database Server with MSSQL Server. This server must be the same version or higher than the source server from whtich the backup was made.
Migrating the LMS database server and LMS database server
- Follow the instructions under Migrating the LMS Database Server. (You can skip the verification steps.)
- Follow the instructions under Migrating the LMS Server