Migrating Winshuttle Foundation 11.x installation from a SharePoint 2010 to 2013 environment
Applies to:
The following processes will help you migrate a Foundation 11.x installation from one SharePoint 2010 environment (the source) to a different SharePoint 2013 environment (the destination).
Important: The instructions on this page only apply when migrating from a SharePoint 2010 environment to a SharePoint 2013 environment.
Prerequisites
- The version number for Winshuttle License Management System (LMS) and Winshuttle SAP Integration Server (SAPIS) must be the same.
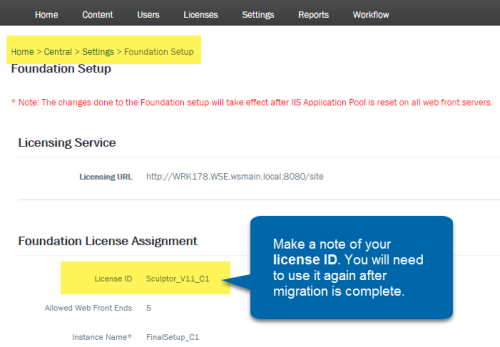
- The LMS Foundation License ID (Foundation Instance) must be the same before and after migration.
- The service accounts used for installing Winshuttle products on the installation being migrated should be the same ones used in the destination environment to avoid any permission-related issues.
Pre-migration checklist
- Before beginning a migration, go to Licenses» Foundation Licenses, and then disconnect / disassociate User Governance and the SAP Integration Server in the source installation from LMS. This will free them up so they can be re-associated after the installation is migrated.
- If there are any published solutions with data connections in the installation being migrated, you will need to re-deploy those solutions with updated data connections and connection strings after migration.
- All Workflow processes and SV Service Jobs should be in a completed state, with the following exceptions: assignmentsummary, emailapproval, offlineformprocessor, createmhtfile, and any recurring jobs.
- Disable all scheduled jobs.
- Disable all background jobs.
- Disable all SVService Window Scheduled tasks, and do not schedule any SVService Window Schedule tasks until after migration is completed.
- Make a note of or copy any changes that have been made to the <authorization> section of the Web.Config file for the Winshuttle Workflow Administration site. These changes will not be migrated, so you will need to manually re-incorporate any changes to the Web.Config file for the newly migrated installation.
- If the Web Application URLs in the destination environment will be different in the destination environment, you will need the User Governance Migration Utility.

| Note: Recurring Jobs (SvService, Winshuttle Transaction, or Winshuttle Query) scheduled to run during the migration period will not be run. |
Note: SVService Window Schedule tasks scheduled in the site being migrated will not be migrated. These tasks will need to be exported from the initial installation and imported into the migrated installation as a final step.
Contact the Winshuttle Support Team to request the User Governance Migration Utility.
Note: If the LMS (License Management System) is also to be migrated, please see Migrating the License Management System for instructions.
Backup and prepare the source site
Back to topOverview: During this phase of migration you will disconnect / disassociate the License Management System and SAP Integration Server, and back up important data to prepare for the migration.
- Convert SharePoint 2010 Web Application from Classic mode to Claim-based.
IF you are using classic authentication for the Winshuttle Workflow web application, you will need to convert it to claims mode. (Detailed instructions can be found in the following Microsoft Technet article: Migrate from classic-mode to claims-based authentication in SharePoint 2013.) You can use the following scripts in SharePoint 2010 management shell (run in the context of Sharepoint Farm Admin user):$webappname = "http://YourWebSiteURL/"
$wa = get-spwebapplication $webappname
$wa.useclaimsauthentication = $true
$wa.update()
stsadm -o execadmsvcjobs
$account = "domain\YourWorkflowAdmin"
$account = (New-SPClaimsPrincipal -identity $account -identitytype 1).ToEncodedString()
$wa = get-spwebapplication $webappname
$zp = $wa.ZonePolicies("Default")
$p = $zp.Add($account, "PSPolicy")
$fc=$wa.PolicyRoles.GetSpecialRole("FullControl")
$p.PolicyRoleBindings.Add($fc)
$wa.Update()
$wa.MigrateUsers($true)
$wa.ProvisionGlobally()
Note: After converting a web application to claims-based authentication, you cannot revert it back to classic-mode authentication. The environment will not be usable.
- Backup the SharePoint Content Database(s) for all WebApps on which User Governance or Workflow is present.
- Backup the Winshuttle Workflow database. In the database machine, take backup of Winshuttle workflow database, and save it. (For example, you could save it as Workflow.bak).
- Backup the User Governance database. On the database machine, backup the Winshuttle User Governance database, and then save it. (For example, you could save it as UserGovernance.bak).
- Create a folder for SVMigrate to use for backup files. On the SharePoint Workflow Front-End where Winshuttle Workflow tools are installed, create folder on the C:\ drive for backup file used by the SVMigrate tool. in c: drive (e.g. BackupData).
- Run the following command to create the workflow mapping Data:
From the SVMigrate tool path (the default is <Your Workflow Install Location>/bin/svmigrate.exe), run one of the following commands:If you are using the same URL after migration:
svmigrate -getSourceGuidAndUrl-f "c:\ BackupData\WFbak.svb"
If you are using a different URL after migration:svmigrate.exe -getSourceGuidAndUrl -f "c:\ BackupData\WFbak.svb" -m "c:\ BackupData\map.xml" - Open the MAP.XML file in the path specified (for example, C:\BackupData\map.xml in the command above). Change the <NewSite> to your new Web app URL. If URLs are not changing, then copy the URL from the <OriginalSite> node to the <NewSite> node.
Tip: If you need to find the content database name: Open the SharePoint User Governance Administration page, and then click Manage Content Database.
Note: There may be multiple Workflow databases depending upon the number of WebApps for which Workflow was installed
Before |
After |
<anyType xsi:type="SiteToSite">
|
<anyType xsi:type="SiteToSite">
|
Migrate Winshuttle SAP Integration Server
Back to top- Install Winshuttle SAP Integration Server on new machine
- Use the SAP Integration Server Admin Tool to migrate the Server database.
Migrating the Foundation 11.x installation
Back to top- In the target environment, create the same number of WebApps that are in the Foundation site being migrated.
- Copy the database backup files (i.e. the Winshuttle Workflow database backup, the SharePoint content database backup, and the User Governance database backup) to the destination SQL machine.
- Restore the Workflow Database (that you backed up in previous steps) for all the WebApps into the destination SQL server.
- Install Winshuttle Workflow in the destination environment. Use the same database restored in the previous step (above). Also, extend the workflow using the Workflow Administration site and use the restored database while extending Workflow for all the required WebApps.
- In Sharepoint 2013, use a text editor to open the web.config file stored at the following path: C:\inetpub\wwwroot\wss\VirtualDirectories\<WebApp>\web.config
- In the web.config file, set the key AllowAnonymousImpersonation to false using the following syntax:
<add key="aspnet:AllowAnonymousImpersonation" value="false" /> - Repeat steps 5-6 for all Web front ends.
- If your are using any Custom Plugins or Participant Resolvers, please copy the respective .DLL files from the GAC in the source environment to the destination environment. <CustomPlugin/CustomParticipantResolver>.dll file in GAC (Global Assembly Cache) from the source environment to the appropriate location in the destination environment.
- Install User Governance in the destination environment.
- Delete the User Governance Databases from the SQL server in the destination environment. (You will be restoring the backup databases from the source environment.)
- Restore the User Governance database that you backed up earlier to the SQL server in the destination environment.
- In the destination environment, open SharePoint Central Administration, and then click Manage Content Databases.
- Click the content database name, scroll down and check Remove content database, and then click OK.
- In the destination environment SQL server, restore the content database that you previously backed up for all Webapps for which User Governance or Winshuttle Workflow are present.
- Open the SharePoint management shell.
- Mount the restored database by running the following script in the destination environment:
Mount-SPContentDatabase -Name "WSS_Content_dbName" -DatabaseServer "SQL_Server_InstanceName" -WebApplication <WebApplication URL> - Access the WFGlobalConfig table in the Workflow database and replace the default paths that are stored in the table with the current SharePoint paths, especially PublicTempDirectory at the end of the table. If you are using an extended Workflow database, replace the paths on it also.
- If the LMS and SAPIS versions are not the same, you must migrate the License Management System. See Migrating the License Management System.
- To migrate Winshuttle Server, Install SAP Integration Server in the destination environment, and then use the SAP Integration Server Migration Utility to migrate databases.
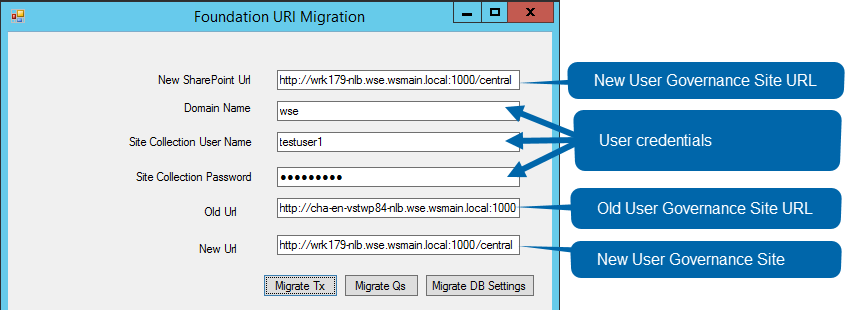
- If the Web Application URLs on the new Farm are different from their original URLs in the destination environment, run the User Governance Migration Utility on a machine with Microsoft Excel. To get this utility contact the Winshuttle Support Team.
- In the Foundation URL Migration screen, enter the following in their respective fields: New Sharepoint URL, Domain Name, Site Collection User Name, Site Collection Password, Old (User Governance) URL, and New (User Governance) URL. User Name and Password, (Domain, User Name and Password), Old User Governance Site URL and New User Governance Site URL.

- Click Migrate Tx to change the source installation User Governance URL to the destination User governance URL for Winshuttle Transaction Scripts and Winshuttle Transaction Data Files.
- Click Migrate Qs to change the source installation User Governance URL to the destination User governance URL for Winshuttle Query Scripts and Winshuttle Query Data Files.
- Click Migrate DB Settings to update the destination User Governance URL in the database. Note: This must be performed from a SharePoint server machine.
- Run the Workflow Migration Utility (SVMigrate) to update the GUID and the Winshuttle Workflow URL.
- Go to the destination environment and copy the ‘BackupData’ folder (created in step 5, above) where Workflow tools are installed.
- Run the following command to update the workflow database in Final Setup.
If you are using the same URL after migration:
<Workflow Install Location>\bin>svmigrate –updateDestinationGuidAndUrl -f "c:\ BackupData\WFbak.svb"
If you are using a different URL after migration, you must also run the following command:
<Workflow Install Location>\bin>svmigrate –updateDestinationGuidAndUrl -f "c:\ BackupData\WFbak.svb" -m "c:\ BackupData\map.xml"
Note: Above command will update the WebApp GUID and URL for all the WebApps.
- Update the Web.config. Any custom changes made to the <authorization> section of Web.Config file for the Winshuttle Workflow Admin site will not be migrated. You will need to re-add the changes to the Web.Config file to access the Workflow User Governance Admin Site. Example:
<authorization>
<allow users="domain\wfadmin " />
<deny users="*" />
</authorization>
Tip: The GAC is a shared library where different applications reuse the code placed in the files located in a common folder. In .NET 4.0, the default GAC location is: %windir%\Microsoft.NET\assembly
Sample Map.XML file for SVMigrate
<?xml version="1.0"?>-<spmigration>
-<table name="WFASSIGNMENT">
<column name="Actor"/>
</table>
-<table name="WFPERFORMER">
<column name="Name"/>
<column name="LookupKey"/>
</table>
-<table name="WFPROCESS">
<column name="Originator"/>
</table>
-<table name="SVAssignment">
<column name="Assignee"/>
</table>
-<table name="WFACTORGROUP">
<column name="ActorLogin"/>
</table>
-<table name="WFDELEGATION">
<column name="DelegateLoginName"/>
<column name="UserKey"/>
</table>
-<site name="Site URL where Sharepoint List is present">
-<list name="Sharepoint List Name">
<column name="Sharepoint List Column Name"/>
</list>
</site>
</spmigration>
- Use SVMigrate to update claim users. To update claim users, you will need to run the following SVMigrate command, and reference an XML file to provide the database columns and corresponding tables. The columns should contain non-claims-based login names after the upgrade from SharePoint2010 to SharePoint2013. When you run SVMigrate, it will replace the login names with their claims-based equivalents. The XML file can also have SharePoint column names and corresponding lists and sites.
<Workflow Install Location>\bin>svmigrate.exe -spmigratexml C:\migrate.xml -c "http://wrk166:5000/" - Run the User Governance Activation Wizard and provide the LMS and SAPIS server URLs. In addition, use the same User Governance License ID (the one initially dissociated in Step 1).
- If the SAP Integration Server URL changes in the final setup, all Workflow solutions that use web services must be republished.
- Make sure that Studio users clear their Appdata folders in case the login URLs are different after migration.