Web Help
|
|
 Home
Home Back
Back Forward
 Contents
 Index
Index Product Help
 Support
 Print
Print Feedback
|
Back to |
Introduction: Creating loops
Sometimes you may need to upload many lines of the same type of information, such as in a table or a grid. Your data consists of information that is the same throughout the transaction, which is the header, and information that changes, which are the many line item details. An example of such a transaction is a VAO1 sales order creation. To ensure that your script returns repeatedly to the same SAP fields to enter new line item detail information, use loops. In your script, the loop tells the script to use that particular code for each item.
To add a loop to a script
- In the Record pane of TRANSACTION, type the transaction you want to use and click Go.
- In the SAP transaction, type in the header detail. Click the green check mark or press ENTER.
- In the form fields, type in the information for one line item. Move to the next line and type information for another line item. While recording the transaction, we recommend that you enter more than one line item in the transaction to create a visible pattern of repetition in the Mapper. Click Save.
- TRANSACTION opens.
- Click Map the SAP data fields. The Mapper appears. Click the Expert tab.
- Select the detail for the second line item. Because only one line item is required to be mapped, delete the second line item. Click the Basic tab.
- Select the line item detail and then click Loop
 .
.Map your header information and line item detail. When you insert the Do While...Loop, the Mapper displays the fields contained within the loop by using two
(Loop icons) connected by a line.
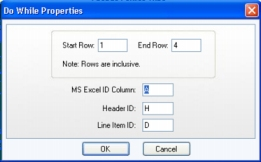
The Excel Do-While Properties dialog box settings are:
Start Row/End Row: Type the Start Row and End Row you want to use, if other than the row or range of rows you initially selected on the Expert Recording Preview.
NOTE: The rows selected must be inclusive.
Excel ID Column: Type the column letter to specify the Excel column that is to contain the Mapper row ID number. For multi-line transactions, by default, the first column of Excel is reserved for the Excel ID. The first ID Column stores the row type, which defaults to a value of either H (Header) or D (Detail/Line Item). When you run the transaction, TRANSACTION uploads all data from row type H to the Header section of the SAP transaction, and all data from row type D into the line items specified in the Mapper.
Header ID: Enter the letter that specifies the header data for the TRANSACTION script recording (default is H).
Line Item ID: Enter the letter that specifies the detail line item data for the TRANSACTION script recording (default is D).
Index-based loop: Index-based loops are available only for scripts that were recorded by using GUI scripting mode for grid and table controls. Using index-based loops, you do not need to create any repeatable patterns for entering data in a grid or table. The loop automatically finds the last available row in the grid or table and appends data. If you are applying a loop around table control fields, you must provide an index field that points to the next empty row. Therefore, you should choose this field carefully to avoid any loss of existing data. Your uploaded data will be appended from the row where this index field is blank, and will traverse from the end of the grid. NOTE: index can be compared to any item that you touch in the GUI.
You can add notes in the Mapper Notes column to looped rows. However, notes cannot be seen if the script is opened in an earlier version of the product.
NEXT: Publishing a data sheet with an embedded script
|
Also in this section Introduction: Record the Business Process Introduction: Mapping the data source to the recording Introduction: Publishing a data sheet with an embedded script |
 Trademarks


