Map the fields in Excel
To manually map fields, you drag in the direction that the data will go. If you are uploading data from Excel to SAP, drag from Excel to the Mapper.
Note: If you already have a workbook that contains all the data, you can open that workbook and map it.
- Click a cell in the Excel preview column where you want to enter the data and drag it to the field row in the Mapper.
If you are downloading data for a field, drag from the Mapper to a column in the Excel preview.
- Repeat for each field that you want to map to the data file.
To map multiple fields at a time, select the rows in the Mapper, click a cell in the Excel preview, and then drag to the selected Mapper rows. Studio maps all the selected rows.
- Click Save and save the file.
To prevent the data file headers from being overwritten, Studio automatically locks the headers. If you want to change the mapping, click Unlock Headers.
Other ways to map fields
Change the mapping direction to Upload to SAP or Download from SAP, and then do one of the following:
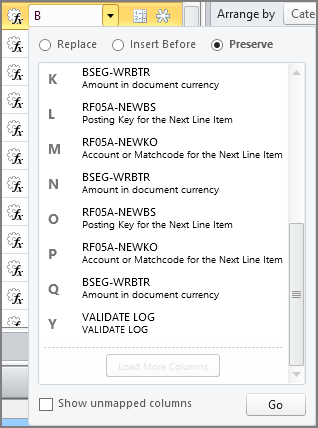
- For column-based mapping: Click the value in the Mapper row, click the drop-down arrow, click the column that you want, and then click Go.
To see more columns, check the Show unmapped columns box. If you scroll to the end of the list and want to see additional columns, click the Load More Columns button.
Note: The column selector is automatically set to map the field before the selected column, but you have two other choices. At the top of the column selector box, you can click Replace, or you can click Preserve, which is how you map multiple fields to a single column.
- For column-based or cell-based mapping: Click the value in the Mapper row, and then type the column or cell that you want.
Change the mapping direction
- Select the field row in the Mapper.
- On the ribbon, click the Map Direction button.

- Click the direction you want:
- Upload to SAP
- Download from SAP
- Fixed Value Upload: These are constant values, where the same value is used in every uploaded record. For example, Company Code might be a fixed value, whereas the Material Number or Employee ID will likely change for each record that is uploaded.
When a field is set as Fixed Value Upload, additional settings are available, depending on the field:
- Clear Header from Column removes the header from the data file, but does not remap the fields.
- Clear All Data from Column removes the header and all values in the column, but does not remap the fields.
- Delete Column removes the header and data from the data file and remaps the fields.
- No Change in Column unmaps the field without making any changes to the data file.
Add or remove fields
The recording contains fields that are hidden until you enable them. To include a field from the recording, do the following.
- Click the View tab, and click Expert View.
- Check the Disabled Fields box to view the fields that have not been enabled.
- Select the field, and then check the box in the Enable column, or click the Map tab and then click Enabled on the ribbon.
To add a custom field, do the following:
- Right-click a row in the Mapper.
- Click Add Blank Row (Insert After).
- In the new Mapper row, type the information for the custom field.
To remove a field, select it and then click Enabled on the ribbon. If the field is extra (for example, an extra click made during the recording), you can permanently remove the field from the Mapper by clicking Delete.
Show the field type and length
If the Retrieve field type information from SAP box is checked in Studio Options (SAP Settings tab), the field type and length are automatically shown in the Mapper.
If the box is not checked, or if the recording was created in Transaction 8.x or earlier, click Synchronize to show the field type and length.
Change the mapping
- Be sure that the headers are not locked.
- Drag from the Excel preview column to the field row in the Mapper.
Studio shows the changes in red.
By default, the field is inserted before the selected column, and the other fields are shifted.
If you want to replace the previously mapped field, click the drop-down arrow, and then click Replace.
If you want to map two fields to the same column, click the drop-down arrow, and then click Preserve.

- To commit the changes, click anywhere in the Mapper or the Excel preview.
Remap all the fields
- Be sure that the headers are not locked.
- Click Restore Mapping.
- Remap the fields.
Cell-based mapping
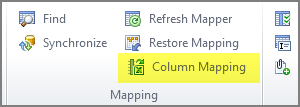
The Column Mapping button on the Map tab shows the type of mapping that is currently selected.
To use cell-based mapping, click the Column Mapping button.
The button switches to Cell Based Mapping.
Validation
When you create a script, you can ensure that anyone who runs that script first validates the data in the accompanying data file before posting it. If you turn on validation, you do not need a separate validation sheet. Validation is off by default.
Any validation errors appear in the validation log column. When you turn on validation, Studio adds a Validate Log column to the data file.
Important: Before you turn on validation, ensure that the commit code appears only at the end of the script. Commit codes are used to confirm the uploading of data into SAP. If the script contains multiple commit codes and validation is turned on, the script does not run. This prevents any partial upload of data.
Exception: PA30 and PA40 are supported if Winshuttle Function Module v11.1 or later is installed.
Turn on validation
- Click the Map tab, and then click Allow Validation.
The button has an orange background when validation is turned on. To turn validation off, click Allow Validation again.
- Map the Validate Log field in the Mapper to the row you want in the data file.
Validation errors will be shown in the Validate Log column.
Validate and Simulate
When Winshuttle Function Module (WFM) is installed on an SAP system, there are two additional ways to validate data:
- Validate: This method is similar to validation without WFM. It checks each line item individually, but it does not ensure that credits and debits are balanced. The results are written back to the data file against each line item. Validation is not supported for HR t-codes.
- Simulate: This method checks the validity of the whole document or record and ensures that the line items are balanced. Simulate is supported only with WFM and only for these t-codes: ME21N, ME22N, ME51N, VA01, VA02, FB50, FB60, and FB70.
Limitations
- WFM does not support validation of multiple Do-While loops in a transaction script.
- Validation is not supported for Access data files that contain loops.
Advanced mapping features
In the Mapper, you can also create nested or indexed loops, add conditions, specify which values are allowed for a field, and add transforms to adjust data. For more information, see the following topics:
Restore an original recording in Studio
Skip screens that are not in the SAP system
For troubleshooting specific situations, see the Winshuttle Support Knowledge Base.