|
|
|
To create sites:
To create a Dorcument Workflow or Form Workflow SharePoint site:
.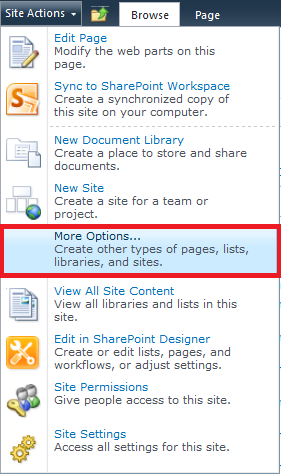
The New SharePoint Site page appears.
For example, if you are creating a Document Workflow site to be used in an engineering department, you could name it Engineering_Documents. If you are creating a Form Workflow site to be used in a finance department, you could name it FinanceDesigner.
NOTE: It is a good idea to use names that contain only alphanumeric characters and underscores. Avoid using spaces and non-alphanumeric characters.
|
See Also |
Winshuttle Designer allows you to automate business processes to meet the needs of your work environment. It leverages elements from SharePoint, including permissions, attributes, and user profile information. With easy-to-use graphical design, Winshuttle Designer can help you to implement processes that contain:
This section provides information about using Designer to create workflows to represent your business processes.
-or-
The following sections describe the Winshuttle Designer interface and how to use it.
The canvas is where you layout the graphical framework of your workflow. This can include nodes and the transitions between them. The canvas is composed of swimlanes representing functional roles in a workflow. By default, every workflow has an Originator and a Process Owner, so these swimlanes are always present. You can add more swimlanes to your workflow as needed to represent additional roles.
Winshuttle Designer Process Guide Toolbar
![]()
Winshuttle Designer Process Guide Canvas
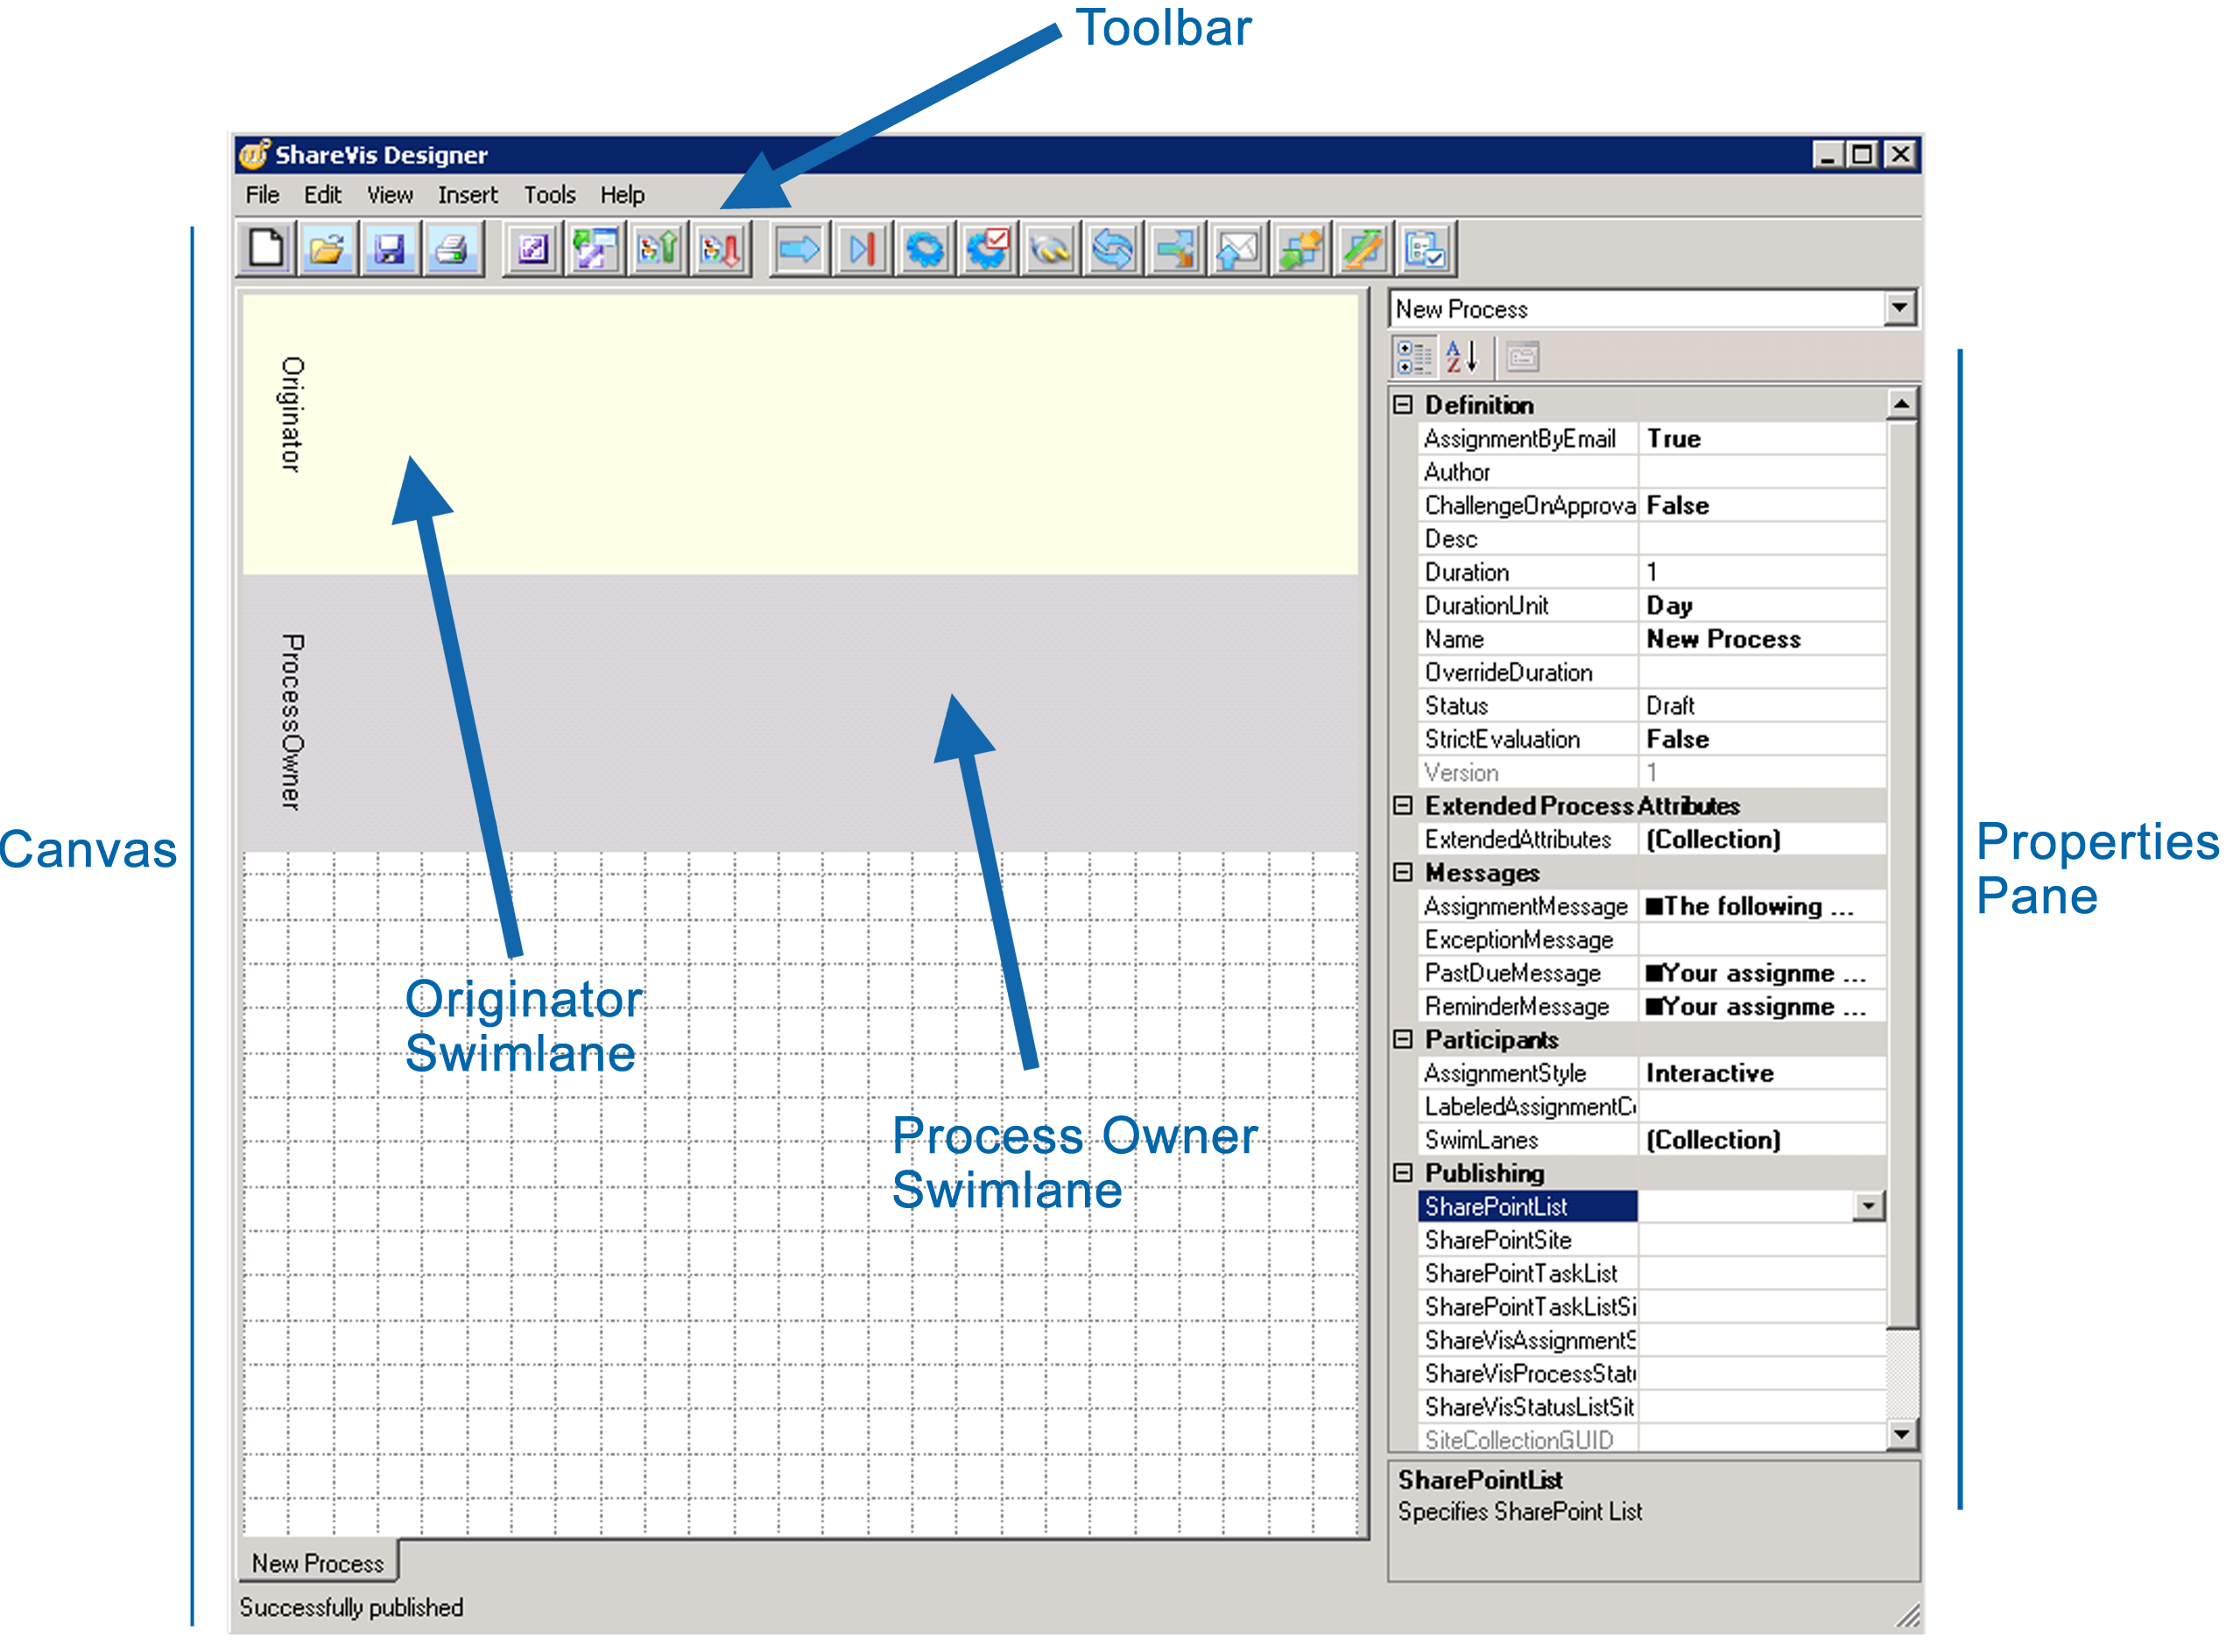
The toolbar buttons allow you to perform various functions as described in the table below. Each function is also available as a command from one of the Winshuttle Designer menus.
Button |
Name |
Action |
|
New |
Creates a new workflow. |
|
Open |
Opens a previously created workflow. |
|
Save |
Saves changes to the current workflow. |
|
Prints the workflow layout. |
|
|
Launch InfoPath |
Starts Microsoft InfoPath. If you have not yet published any forms, a new InfoPath window opens. Otherwise, the last published form opens. |
|
Publish InfoPath Form |
Publishes the selected form to the specified SharePoint site. |
|
Publish |
Publishes the current workflow in Designer to the specified SharePoint site. |
|
Retrieve Workflow |
Displays the workflows for the selected site allowing you to choose one to be loaded into Designer. |
|
Retrieve Solution |
Displays the Solution files from central site allowing you to choose one to be loaded into Designer. |
|
Start Node |
Creates a Start node to indicate the beginning of a workflow. |
|
End Node |
Creates an End node to indicate the completion of a workflow. |
|
Activity Node |
Creates a step in the workflow that requires one or more participants to complete a task before the workflow continues. |
|
Approval Node |
Creates a step within a workflow that allows one or more participants to approve or reject an item under review. |
|
Plug-in Node |
Allows you to integrate programming (in any of the .NET languages) into a workflow to interface with external systems. |
|
Loop Node |
Allows you to create a sub workflow within a workflow. |
|
Decision Node |
Creates a node with branching in the workflow. |
|
Notification Node |
Creates a step within the workflow that sends an email notification. |
|
AND Join Node |
Creates a step within a workflow that uses conditional logic (AND) to evaluate the next sequence of execution in a workflow. |
|
XOR Join Node |
Creates a step within a workflow that uses conditional logic (OR) to evaluate the next sequence of execution in a workflow. |
|
Value Setter |
Creates a node that sets an existing or computed value into a form or a SharePoint column. |
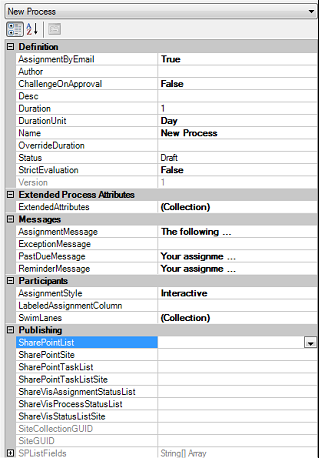
The Properties pane in the Winshuttle Designer window lets you view and change the properties assigned to a workflow or individual nodes and transitions in the workflow. Each item has different properties and settings. To change a setting, click in the text box to the right of the property name. Some properties include a […] button, which you can click to specify more settings, or a drop-down list from which you can select a setting.
NOTE:
Workflows are composed of swimlanes, representing the functional roles in a process. Each swimlane in a workflow appears in the Designer canvas. When a workflow is started, real people must be assigned to a swimlane and the swimlane behavior set. Swimlanes are associated with SharePoint groups, and tasks are assigned to (placed within) swimlanes.
Every process must have at least the following swimlanes, which are created automatically:
WARNING: The Originator and a Process Owner swimlane are set as default participants in every workflow. Do not remove these swimlanes.
You can add as many swimlanes as you need for your work environment. Swimlanes are configured through the Swimlane Collection Editor, which allows you to add, edit, and delete swimlanes, and to set the assignment behavior for a swimlane.
The Swimlane Collection Editor appears.
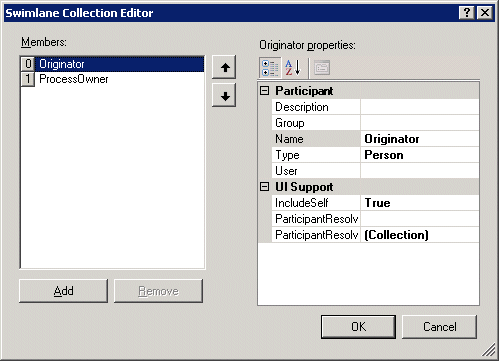
The Members area lists the current swimlanes in your process. You can add as many swimlanes as you need for your workflow. To assign tasks to a participant, the participant (individual or group) must be associated with the swimlane.
NOTE: You must add the participants of the workflow as members of your SharePoint site and configure SharePoint site settings before you add participants.
The Edit Description dialog box appears.
For example, if the swimlane will represent a group of managers, you could type Managers.
NOTE: It is a good idea to use names that contain only alphanumeric characters and underscores. Avoid using spaces and non-alphanumeric characters.
The options available in the Group drop-down list depend on what you have configured in SharePoint.
NOTE: Groups are referenced from the SharePoint site associated with the current project. Groups must be defined in the SharePoint site prior to creating a workflow in order to be available in Designer as a participant in a project.
NOTE: In most circumstances, this setting is not recommended, since if in the future the specified person is no longer involved in the workflow, you will need to modify the swimlane.
(Note: If you selected PersonFromRole or TeamFromRole in step 8, the User property is irrelevant.)
If left blank, it will default to SelectFromRole. (See the Winshuttle Actions Reference Guide for detailed information about each Participant Resolver type and arguments).
NOTE: Changing the swimlane order changes how the participants assigned to the swimlanes function in the workflow. Workflow activities, however, are assigned to swimlanes and do not change their location.
Your swimlanes appear in the Designer canvas.
The Swimlane Collection Editor appears.
NOTE: You cannot remove the Originator or Process Owner swimlane.
The corresponding swimlane is removed from the Designer canvas.
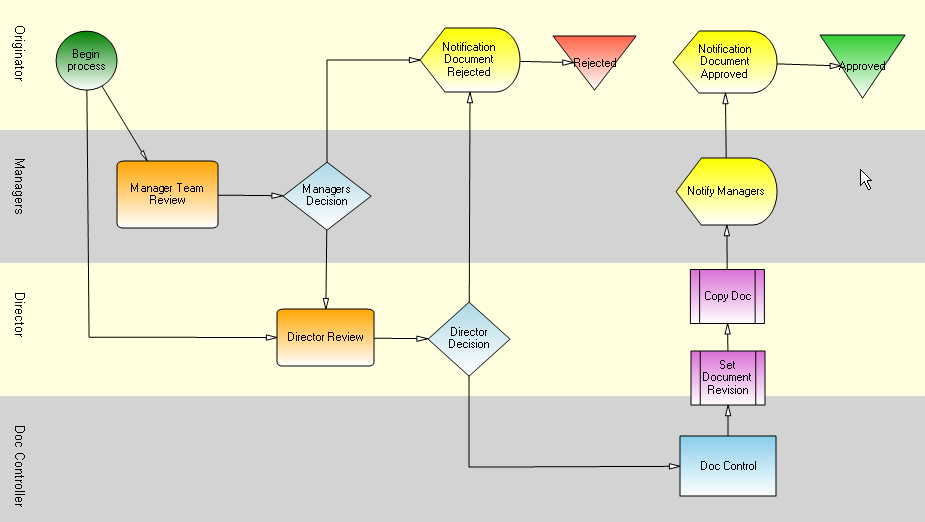
A workflow is a graphical representation of the flow of steps in a business process. It can be simple, with only one or two steps, or complex with many steps and participants. You can create a workflow, and then modify it at any time if there are changes in your business process.
An empty canvas appears.
For example, if you are creating a workflow for routing a capital expenditure request form, you could type CapitalExpenditureRequest.
The Save As dialog box appears.
CapitalExpenditureRequest.svpNavigate to the location where you want to save the file and click Save.
NOTE: Although your new workflow has been saved, it is not available for use until you publish it. See "Publishing a Workflow (below).
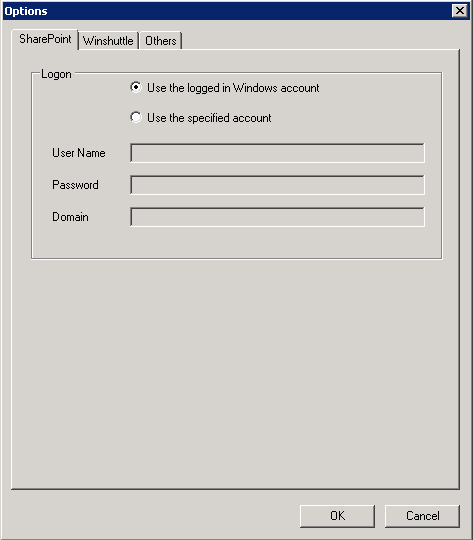
Associating your workflow with SharePoint allows you to access lists and group memberships from within a SharePoint site. You must associate your workflow with SharePoint before you can publish and use it.
Winshuttle Designer verifies your logon settings against the SharePoint site you have associated with this process. If the SharePoint site was accessed successfully, you can proceed with adding nodes to your workflow as described in the next section. If there is a permission error and you cannot access the specified SharePoint site, you must complete steps 2-7 below.
The Options dialog box appears.
A node is a point within a workflow that represents a step in a business process, such as a task or activity, a decision, or a request for approval. Nodes are assigned to participants by placing them within a corresponding swimlane in the Designer canvas. For some nodes, the swimlane placement is important. For other nodes, it is not. Each node has configurable properties that define the behavior of the node.
NOTE: For detailed information about each node type and its properties, see Appendix C.
NOTE: We recommend placing the Start and End nodes in the Originator swimlane. However, depending on your workflow, you may choose a different swimlane.
You can set Node properties to define settings for each node in your workflow.
The Properties pane displays properties for the selected node. The available properties depend on the node type.
For information about the properties of each node type, see Appendix C.
Transitions are used to define the sequence of steps in a workflow by connecting one node to another node or nodes. Each node can have an unlimited number of transitions originating from it or going to it. You can set properties for a transition that define the conditions that must be met before moving from one node to another.
Transition properties allow you to define conditions that must be met before moving from one node to the next. For example, you can set conditions based on SharePoint column values such as Priority or Amount, or based on the current workflow state such as Approved or Rejected. Before you can use form fields on your condition, the field must first be promoted to SharePoint through InfoPath Designer Form Options section.
NOTE: See Appendix D for detailed information about transition properties, including shortcuts you can use when setting transition properties.
|
Description |
Logical Operators |
Description |
== |
Equal |
&& |
And |
!= |
Not equal |
|| |
Or |
> |
Greater |
! |
Not |
>= |
Greater than or equal |
|
|
< |
Less |
|
|
<= |
Less than or equal |
|
|
= |
Assignment |
|
|
See Appendix D for examples of frequently-used conditions and their Boolean expressions.
Your workflow is updated to include the transition properties you specified.
Data from SharePoint in either SharePoint columns or form data can be used in many different contexts in your workflows. For example, you can use SharePoint column values as follows:
In general, referring to the value of a SharePoint column is done by surrounding the SharePoint column name with square brackets. For example, if you have a column named "Invoice Number," you could compose an email message with that data in the email as follows: Your invoice with number [Invoice Number] has been approved.
In FormEx, if you have a form field that you want to use in your workflow, promote the field to be a SharePoint column and then refer to it as previously described.
In addition to referring to SharePoint column values, there are also several pseudo fields that represent values in the current environment. They are:
[$Assignment.Id] |
The internal identifier of the current assignment, where applicable. |
[$CurrentUser.LoginName] |
The complete domain-qualified login name for the current user. |
[$CurrentUser.Email] |
The email address of the current user. |
[$CurrentUser.Name] |
The full name of the current user. |
[$CurrentUser.UserName] |
The user name portion of the login name. |
[$CurrentUser.UserDomain] |
The domain name portion of the login name. |
[$Process.Id] |
The internal identifier of the current process, where applicable. |
[$Site.Url] |
The fully qualified URL of the current site. |
[$Site.ServerRelativeUrl] |
The path portion of the current site's URL. |
[$Site.Authority] |
The non-path portion of the current site's URL. |
NOTE: You can also use Windows environment variables. For example, the syntax for a variable named MY_ENV_VAR is [%MY_ENV_VAR%]. You can also use values from the sharevis.config file in your plug-ins. The syntax for a sharevis.config file value is [$Key$], such as [$TempDirectory$].


