 Home
Home Contents
 Product Help
 Support
 Print
Print Feedback
Uploading data with Journal Entry Management
Open a solution in Foundation
- Open Excel and click the Winshuttle Run tab.
- Click Log in to Foundation. If necessary, add the URL of your Foundation site and type in your user name and password.
- Click Open from Foundation .
- Select the Journal Entry Management (JEM) template that is appropriate for your task. Click OK.
The template opens in read-only mode. Click Save to save a local copy.
If the author attached support documents to the template, you can view these from the Attachments button.
Write headers
If the Excel headings do not appear in the worksheet, click Write Headers.

JEM adds the headings to the sheet.
Note: This feature must be turned on by the script author.
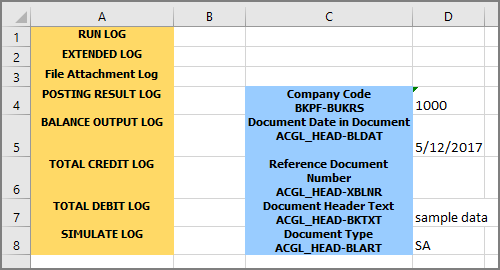
Enter data
When you enter data, some fields have lookup values, so you can choose the value from a list.
- Enter the Company Code, document dates, posting dates, and any tax information.
Notes:
For fields that are required by the template but are not present in your SAP system, you can enter a skip indicator ( / ).
Long text is handled as a loop. JEM supports multiple loops that are at the same level, although it does not support nested loops.Important: Ensure that you add the date in the correct format that is defined in your SAP system. JEM does not automatically correct date formats.
- Enter data in the item cells.

Notes:
In BAPI templates, debit amounts must be specified as negative amounts. For example, a debit of $50 is written as "-50".
Leave at least one empty row below the last line item. - Save the workbook. You can park the sheet, if needed. See Park or Save as Completed. Note that for BAPI templates, "park" is not available.
Use a List of Values (LOV)
For some fields, a custom list of values (LOV) may be available.
- Click Lookup Values.

- Select the value that you want.
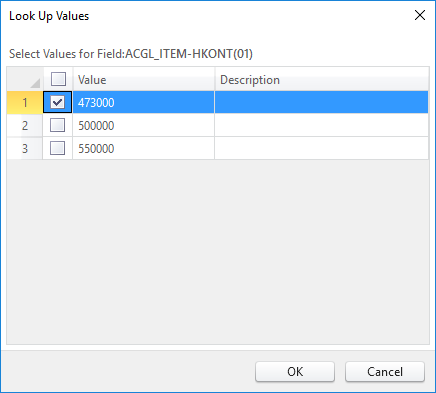
If the solution author specified a custom list, you will see only those values. Otherwise, SAP GUI will open, and you can search for and select a value.
Clearing data
You can undo entries made in the template.
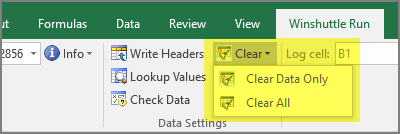
- To clear only data, click Clear, and then click Clear Data. All edits are removed. If you need to restore these changes, click File, click Open, and then select the file of the same name. Your changes up to your last save are restored.
- To clear all data and all formatting, including customizations and headers, click Clear, and then click Clear All. You can now select a new template that will be opened under the same file name, unless you select to save it under another file name.
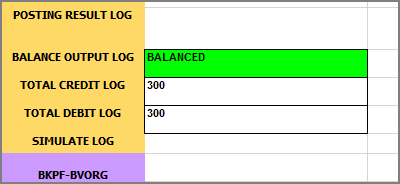
Check the data
In JEM, you can confirm that the document is balanced and that the data meets all of the requirements that are specified in the solution's properties. For this step, you do not need to be logged onto SAP.
When you check the data, the messages that are returned in the log results can show the technical names of the fields, the field descriptions, or both. To set this option, click the File tab, click Options, click the Logs & Errors tab, and then under Validation log messages check the boxes that you want.
On the Winshuttle Run ribbon, click Check Data.
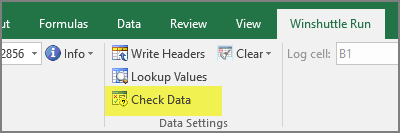
Journal Entry checks that the data meets all the script's requirements for field type and length, required fields, and allowed values, and to confirm that the document is balanced.
If not, edit the entries and validate again until the sheet balances.
Validate and Simulate
Validate checks each line of data against the requirements of the SAP system, and it returns messages for each line. This makes it easier to locate any errors. You do not need to split the document before you validate it, and the Winshuttle Function Module (WFM) is not required.
Note: If you are scheduling the run to be posted later, and the WFM is installed on the SAP system, you can use the Simulate command instead. The document must be split before you simulate it.
Validate on SAP
Click Validate to check that each line of data conforms to the requirements of the SAP system. You must be logged on to SAP.

Simulate
Simulate checks the fields in each line item against the script's requirements and checks the entire document against the requirements in SAP.
Simulate is especially helpful if you are scheduling the solution to run at a later time.
The document must be split before you use Simulate, and the Winshuttle Function Module (WFM) must be installed on the SAP system.
Click Simulate.

Splitting documents
When you try to post a document that exceeds the specified document length, you are notified that the document is too long. The best practice is to split the document, if splitting has been enabled by the script author.
The way that you split a document depends on the transaction code. For step-by-step instructions, see Split documents.
Important:
JEM cannot split a column-based document that contains multiple loops at the same level.
Documents that contain an amount in the header cannot be split.
If you do not split the document, the results vary, depending on the mapping:
- Cell-based: The document is run up to the maximum number of rows; the rest of the document is not processed.
- Column-based: The entire document is run, even though it exceeds the document length. Any rows that exceed the SAP limit will not be posted.
Submit a data sheet for approval
Depending on the process in your organization, before you can post a data sheet to SAP, the sheet and data must first be approved.
Submit a sheet
- Start Excel and open a blank workbook.
- Click the Winshuttle Run tab and log on.
- Click the Foundation tab, click Open, and then click Open Data File.
- Choose the file that you want to run.
- Click Submit to Foundation.
- On the Data file workflow tab of the wizard, choose a reviewer.
- If this is an AutoRun file, choose the action (Post, Park or Save as Completed). The list of available actions is based on settings in the JEM solution.
After the data file is approved, it will be ready to run. Depending on the review process, you, the reviewer, or another person will run the solution and upload the data.
Post, Park, and Save as Completed
Depending on the actions specified by the solution author, you post the data, park it, or save it as completed.
Note: In JEM, you cannot specify the End Row value. This is to prevent the partial upload of journals. Instead, JEM will automatically upload all data on the worksheet.
Open the data file from Foundation
- Start Excel, click the Winshuttle Run tab, and click Log on to Foundation.
- Do one of the following:
- If there is no workflow assigned to the data file, click Open from Foundation, and then click the data file that you want.
- If there is a workflow assigned to the data file, click Task List, and then click the document that you want.
- Post the document or park or save as completed.
Post a document
- Save your document.
If you are running the solution on a nonproduction system, you must save the file to your computer.
- Click Post.
The SAP Logon dialog box appears. Select your SAP system and enter your credentials, as necessary.
The Journal Entry Management toolbar indicates the SAP system you are logged onto.
Note: If the list of SAP systems is empty, please see the instructions below.
- When the data is successfully uploaded to SAP, the SAP document number appears as a hyperlink. Click the link to verify that your data is in SAP.
Note: If you try to validate or post and a message appears that says Excel is in Editing mode, save the sheet and try again.
- To complete the process, click the Tasks button, select the Run required task that you performed, and then click Complete Task.
The status notification is removed from the file, and the file is moved to the Completed Data Files library in Foundation.
Park or Save as Completed
Note: A document does not need to be balanced to be parked. It must be balanced before you can save it as completed.
- Save your document.
- Click Park or Save as Completed.
The SAP Logon dialog box appears.
- Select your SAP system and enter your credentials, as necessary.
The Journal Entry Management toolbar indicates the SAP system you are logged onto.
Note: If the list of SAP systems is empty, please see the instructions below.
- When the data is successfully uploaded to SAP, the SAP document number appears as a hyperlink. Click the link to verify that your data is in SAP.
Note: If you try to validate or post and a message appears that says Excel is in Editing mode, save the sheet and try again.
- To complete the process, click the My Actions button. Select Completed. Click Complete Task.
The status notification is removed from the file, and the file is moved to the JE Data File Completed folder in Foundation.
If the list of SAP systems is empty
If the list of SAP systems is empty, JEM might not be able to find your saplogon.ini file at the expected location: C:\Users\<your username>\AppData\Roaming\SAP\Common.
To find the saplogon.ini file, do the following:
- Start your SAP Logon Pad.
- Click the button in the top left corner, and then click Options.
- Click SAP Logon Options in the menu.
- Click Configuration Files or Local Configuration Files.
The path to your saplogon.ini file is displayed.
- Move the file to C:\Users\<your username>\AppData\Roaming\SAP\Common.
Or, if your organization has defined a different path for the SAPLogon.ini file in Studio v11 or Transaction, you can change the JEM options by clicking File > Options > SAP Settings and typing in the correct path.
Debug mode
If the solution returns errors during Park, Post, or Save as Completed, you can look for the problems by running the solution in Debug mode.
On the Winshuttle Run tab, click Debug, click Debug Specified Range or Debug First Transaction, and then click the action that you were running.
Journal Entry Management will step through the solution in SAP GUI to help you identify the issues.
Attaching documents
For some processes, you may need to or want to attach the current Excel workbook. In JEM, you do this after the documents have been parked or posted and the links to the document are returned.
Document types that can be attached include .xlsm, .rtf, .htm, .pptx, and .txt files, email messages, and images. Ensure that the size of each attached document does not exceed the limit that is set in the JEM options.
Choose the document attachment method
Click File, click Options, click Attachment Method, and then click one of the following options:
- BDS: Creates an attachment.
- GOS: Stores the business document in an archival table, so that main tables are not affected by large attachments.
Note: The GOS method is available only when Winshuttle Function Module is installed.
Attach documents
- When the document is validated and parked or posted, click the Attach Document button.
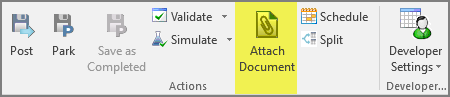
You might need to sign in to SAP.
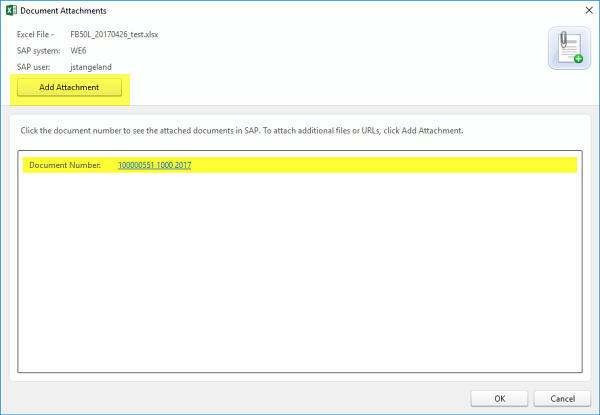
- Select the document that you want to add attachments to, and then click Add Attachment.
- In the Add Attachment(s) window, do one of the following:
- To add the current workbook to SAP, click Attach Current Workbook.
- To add a different document, click Attach Other Documents, click Browse, and locate the file.
- Click Create External Document URL, type the URL in the URL Path column, and then type a description.
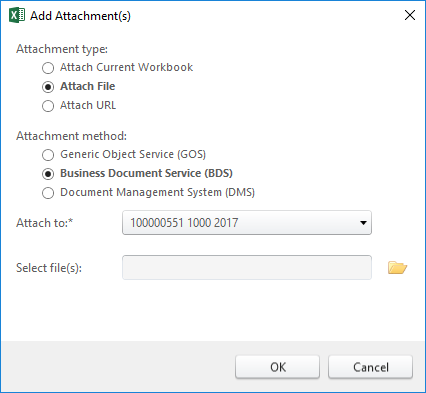
- Choose the attachment method that you want to use
- Generic Object Service (GOS): Store the business document in an archival table, so that main tables are not affected by large attachments.
- Business Document Service (BDS): Create an attachment.
- Click the Browse button to browse to the file.
You can attach .png, .jpg, .jpeg, tif, tiff, .gif, .bmp, .txt, .htm, .xlsm, .xlsx, .xls, .msg, .pdf, .pptx, .rtf, .doc, and .docx files.
- Click OK.
- Add another attachment or click OK.
- Click the document number link to view the posted document through the SAP GUI. When finished, click Close.
Note: When you view an .xlsm file, you might receive an alert that the file extensions do not match and asking whether you trust the file. Click Yes. The correct file, with the macros, will open.
Workbook and sheet switching
Parking, posting, and simulating long sheets with thousands of lines of data may take several minutes. However, you can work on other workbooks and sheets while a park, post, or simulate action is in progress for one workbook or sheet. Logs and messages are reported on the same sheet or workbook in which the action was started.
 Trademarks