Add transforms
By using Excel formulas during the mapping stage, you can transform data before uploading or downloading it. This feature is available for Excel data files.
- In the Mapper, click the field that contains the values you want to transform. On the ribbon, click Add Transform.
- In the Transform Rule box, enter the Excel formula.
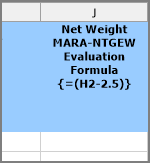
In the example below, the formula for the field Net Weight will be applied to net weight values that start from cell H2, and the transformed value will be stored in column J from cell J2 onwards.

Notes:
If the formula is offset by one or more rows, you can specify that in the Row where formula will be evaluated box. For example, if you offset the formula above by one row, type 3 in the box.
If you are using a date in the formula, wrap the formula in the =TEXT( , "mm/dd/yyyy") function. For example, if the formula is =today()+1, enter =TEXT(today()+1, "mm/dd/yyyy").
Transforms on header fields apply only to rows that contain header data, and transforms on line-item fields apply only to rows that contain line-item data. If you have header and line-item data mapped to the same column, you will need to add the transform twice. - To validate the Excel formula, click Validate.
Note: The Validate option is supported only for formulas that are entered in English.
- Do one of the following:
- To overwrite the original data, change column letter in the Column box to the original column—in the example, F. Click OK.
- To retain the original data, click OK.
The spreadsheet includes the formula in the header row.