 Home
Home Help Center
 Support
 Print
Print Feedback
Back to |
Related Topics |
Publishing a solution
Designer 10.6 and later
To submit a solution for approval
If a solution includes scripts that will be published to a production server, the solution must be approved and stored on CENTRAL. A Solution by default must be approved. To remove the requirement for approval, see Workflow Configurations in the CENTRAL Administration Guide.
- On the File menu, click Submit Solution.
- In File Path box, ensure that the location of the solution to be submitted is correct.
- Add a title and description. The Submit is available only when a title is added.
- In the CENTRAL Destination box, browse to the correct destination.
- Click Submit.
To publish a solution
After the solution has been approved and has moved to Production status, you can publish the solution.
- In Designer, on the File menu, click Publish Solution.
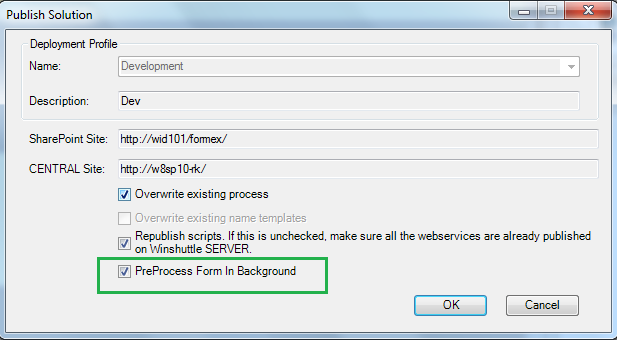
- The Publish Solution box displays the Deployment name, the Description, the SharePoint site where the solution will be published, and the CENTRAL site.
- If you don't wish to republish all Web services, de-select Republish scripts (it is checked by default). Click OK.
- In the Publish Solution dialog box, you have the option to pre-process the form in the background. Publishing a solution with this option sends the solution file to the server and does not wait for the publish process to complete.
The pre-process option publishes the form independently of the solution (otherwise the form and solution are published as part of the same process). This option can be useful when you publish solutions that contain large, complex InfoPath forms (for example, forms with lots of fields, views, layouts, etc.), or if you are experiencing timeout errors when you publish a solution.
If email notification is setup on the workflow server, then the server sends an email notification to the publisher that the form has been successfully published. It's recommended to wait for the mail notification before starting the form process; otherwise, if the server is still processing the form you may get a 'timeout' error.
If you choose the PreProcess Form in Background option, after clicking OK a status bar message will confirm that the solution has been published. ("Solution published and form request sent to the server.")
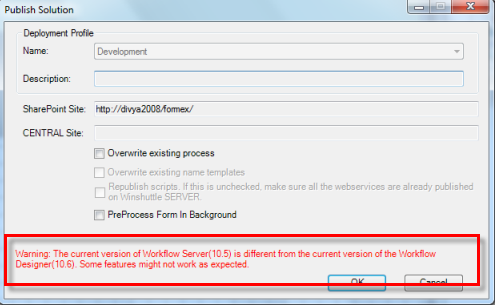
- In addition, if you are using Winshuttle Designer 10.6 and you are publishing to an environment in which the version of Workflow Server is an earlier version (10.5 or earlier), a warning dialog will appear to inform you that some features might not work on the server. (Click OK to continue).
The solution is validated and published.
Designer 10.5 and earlier
To submit a solution for approval
If a solution includes scripts that will be published to a production server, the solution must be approved and stored on CENTRAL. Solution package by default must be approved. To remove the requirement for approval, see Workflow Configurations in the CENTRAL Administration Guide.
- On the File menu, click Submit Solution.
- In File Path box, ensure that the location of the solution to be submitted is correct.
- Add a title and description. The Submit is available only when a title is added.
- In the CENTRAL Destination box, browse to the correct destination.
- Click Submit.
To publish a solution
After the solution has been approved and has moved to Production status, you can publish the solution.
- In Designer, on the File menu, click Publish Solution.
- The Publish Solution box displays the Deployment name, the Description, the SharePoint site where the solution will be published, and the CENTRAL site.
- If you don't wish to republish all Web services, de-select Republish scripts (it will be checked by default). Click OK.
Publishing a solution with this option sends the solution file to the server and doesn’t wait for the publish process to complete. In addition, if email setup is configured properly on the workflow server machine (i.e. either SmtpHost key or SMTP server on local machine where workflow server is setup), then the server sends an email notification to the user who published the form that the form has been published successfully.
The solution is validated and published.
It's recommended to wait for the mail notification before starting the form process; otherwise, if the server is still processing the form you may get a 'timeout' error.
 Trademarks