 Home
Home Help Center
 Support
 Print
Print Feedback
The Designer user interface
The image below shows the 5 main parts of the Designer interface. Click the links to read more about each part.
Designer user interface overview
- Designer overview (video)
- Toolbar overview
- Canvas overview
- Property Pane overview
- Swimlane overview
- Solution Tree Pane overview

Watch the following video for a guided tour of Designer from the Winshuttle Youtube channel.
Designer overview (video)
Toolbar overview
![]()
The toolbar buttons give you quick and easy access to commands and functions, such as inserting nodes, saving files, etc. Each button and its function is described in the table below. Note that each function is also available as a command from the Winshuttle Designer menu bar under File, Edit, Insert, etc.
Button | Name | Action |
| New | Creates a new workflow solution for forms. |
| Open | Opens a previously created workflow/solution. |
| Save | Saves changes to the current workflow/solution. |
| Prints the workflow layout. | |
| Launch InfoPath | Starts Microsoft InfoPath. If you have not yet published any forms, a new InfoPath window opens. Otherwise, the last published form opens. |
| Publish InfoPath Form | Publishes the selected form to the specified SharePoint site. |
| Publish | Publishes the current workflow in Designer to the specified SharePoint site. |
| Retrieve Workflow | Displays the workflows for the selected site allowing you to choose one to be loaded into Designer. |
| Retrieve Solution | Displays the Solution files from central site allowing you to choose one to be loaded into Designer. |
| Creates a Start node to indicate the beginning of a workflow. | |
| Creates an End node to indicate the completion of a workflow. | |
| Creates a step in the workflow that requires one or more participants to complete a task before the workflow continues. | |
| Creates a step within a workflow that allows one or more participants to approve or reject an item under review. | |
| Allows you to integrate programming (in any of the .NET languages) into a workflow to interface with external systems. | |
| Allows you to create a sub workflow within a workflow. | |
| Creates a node with branching in the workflow. | |
| Creates a step within the workflow that sends an email notification. | |
| Creates a step within a workflow that uses conditional logic (AND) to evaluate the next sequence of execution in a workflow. | |
| Creates a step within a workflow that uses conditional logic (OR) to evaluate the next sequence of execution in a workflow. | |
| Creates a node that sets an existing or computed value into a form or a SharePoint column. |


Canvas overview
The Canvas is the term used to describe the blank workspace where you create workflows and includes the toolbar, swimlanes, and properties pane. |  |
Property Pane overview
The Properties Pane reflects the attributes and settings of what is highlighted in the canvas. The Properties pane lets you view and change the properties assigned to a workflow or individual nodes and transitions in the workflow. Each item has different properties and settings. To change a setting, click in the text box to the right of the property name. Some properties include a […] button, which you can click to specify more settings, or a drop-down list from which you can select a setting. | 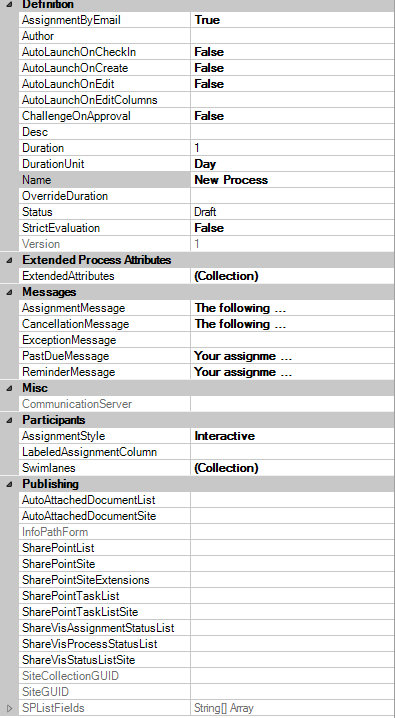 |
Swimlane overview
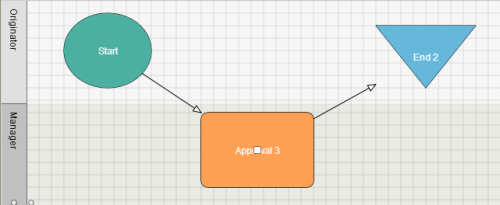
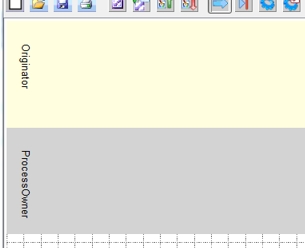
Workflows are composed of swimlanes, representing the functional roles in a process. Each swimlane in a workflow appears in the Designer canvas. When a workflow is started, real people must be assigned to a swimlane and the swimlane behavior must be set. Swimlanes are associated with SharePoint groups, and tasks are assigned to (placed within) swimlanes. Every process must have at least the following swimlanes, which are created automatically:
You can add as many swimlanes as you need for your work environment. Swimlanes are configured through the Swimlane Collection Editor, which allows you to add, edit, and delete swimlanes, and to set the assignment behavior for a swimlane. |
|

Solution Tree Pane overview
The Solution Window enables you to interact with and set properties for each element contained within a Winshuttle Solution. Workflow Solution Management provides you with an integrated authoring experience and ensures that your deployment of workflows, forms, and documents is streamlined from start to publication in your environment. See the Designer Conceptual Overview section for a more detailed description of each of the elements (Form views, Deployment profiles, etc.) that comprise a Winshuttle solution.
|
|

 Trademarks