 Home
Home Help Center
 Support
 Print
Print Feedback
Creating a Solution Package for Forms
Working with solutions
The following steps will walk you through the general end-to-end process of creating, saving, and publishing an entire solution for forms.
On this page
- Creating a new workflow solution for forms
- Designing the form
- Designing the workflow
- Creating a deployment profile
- Saving the solution
Creating a new Winshuttle Solution for Forms
- In Designer, on the File menu, point to New, and click Workflow Solution for Forms.

The Solution Tree appears with containers for any components you might use in a solution.
- In the Form View drop down list, click New Process.

- In the right-hand pane, under Publishing, click in the field next to SharePointSite.
- In the SharePointSite field, type the URL of the target publishing site, and then press Enter. (Example: http://MyFormSite/Forms )

- In the Winshuttle Solution Window (the upper right-hand pane) right-click Transaction Scripts, and then click Import.
- Browse to the script you want to import, and then click Open.
- In the right-hand pane, in the WebService Description field, type a description for your newly imported Transaction script. (Note: If you use the same script in more than one process, you must change the name for each or you can set the IsOverwriteAllowed property to "true".)
- On the menu bar, click Tools, and then click Manage Field Mappings.
- Click Add.
- In the script Name drop down menu, select the Script Name/Web service you wish to publish. The description entered in step 7 should autopopulate the Description field in the New Web Service Dialog.
- Add an XML group name (Alphabetic characters only and no spaces. For example, MyXMLGroup).
- Select either Use the logged in Windows account or Use the specified account to specify a different account from the one you're currently logged in with. If you select Use the specified account, enter the Username, Password, and Domain for the account in the appropriate fields below).
- Click OK.
- Click Generate InfoPath Form. The script fields are now mapped, and you can now design the look of the InfoPath form. Click OK, and then click OK again.)
Designing the form
- If you haven't saved your solution yet, click File, and then click Save Solution. Type a name for the save file and then click Save.
- Click File, and then click Launch Infopath.
- The form appears with the fields listed in the Fields pane.
- Expand the XML Group.
- Drag the input fields you want to use to the form canvas (below the dotted line).
- Drag the output fields you want to use below the input section.
- Add Winshuttle/ShareVis controls to your form:
- On the InfoPath ribbon, in the Controls section, click the arrow to expand the Controls pane.
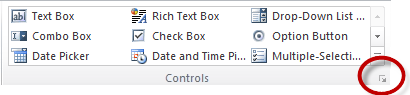
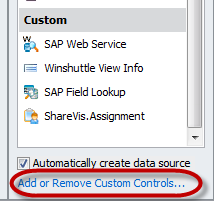
- At the bottom of the Controls pane, click Add or Remove Custom Controls.
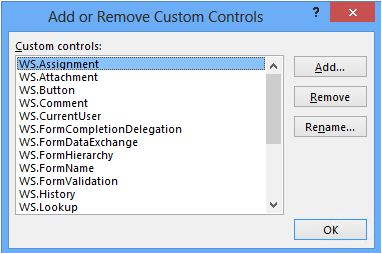
- Click Add.
- Select ActiveX Control, and then click Next.
- In the Select a control window, select the control you need and then click Next.
- Make sure Don't include .cab file (the default) is selected, and then click Next.
- In the Binding Property window, leave the default value selected and then click Next.
- In the Enable or Disable property window, leave the default value selected and then click Next.\
- Click Finish, and then click Close.
- In the Add or Remove Custom Controls dialog, click OK.
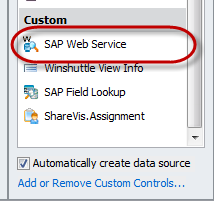
- In the Infopath Controls Pane, under Custom, drag the SAP Web Service control to the end of the Input section in your form.
- Right-click the SAP Web Service control, and select SAP Web Service Properties.
- Click the SAP Web Service Info tab.
- Click Add.
- In the Web Service drop menu, select the Web service you want to use, and then click OK.
- In the Web Service window, click the name of the Web service that you just added.
- Check the When button is pressed box. (You can also type a description in the When button is pressed field if you wish to change it.).
- Click OK.
- On the InfoPath menu bar, click File, and then click Save to save the Infopath form.
If you added a control:
- Right-click the control and then click Properties.
- Thereafter, they must choose from a drop-down list of the Web Service(s).
- Click the name of the retrieved Web Service. Make sure the values are correct, and then click the checkbox "When button is pressed". (Note: You can change the name of the button on the text field to the right of the checkbox.)
WARNING: Do not click Save As. If you click Save As, the form will be separated from the solution.
NOTE: InfoPath views are not supported. Views need to be created from the solution and not from within an infopath file. If you create a view in InfoPath, it cannot be used in Workflow.
Designing your workflow
- Design your workflow.
- In Deployment Profiles, add the Deployment Profile name and description and the SharePoint site URL.
- Save the solution. The extension is .wssln.
- If the solution includes a script that will run on a production server, it must be submitted for approval before it can be run. Click File, and then click Publish Solution.
You can add a title and a description for the solution, but you can submit it only to the CENTRAL site that was specified. If your system requires approval, then even a solution is only for a test environment must still be submitted.
Creating a deployment profile
- Right-click Deployment Profile and then click New, or right-click Development, Staging, or Production and click Edit.
- Add a description.
- Under CENTRAL Site URL, add the CENTRAL site address where the package will reside. When you set the CENTRAL site URL, you are setting the SAP server.
Under Winshuttle Scripts, each script in the solution is listed, along with the associated web service.
- Click Go.
- To specify that System Post is allowed for the solution, select System Post. Select the user name for the user under whom system post will be submitted.
- If you receive an error message, click Validate. Ensure that IsOverwriteAllowed is not set to false and that no script exists with the same name.
Saving the solution
- On the File menu, click Save Solution.
 Trademarks