Applies to:
- Winshuttle Foundation
6-2. Add vendor search
Back to
Steps in this phase
In this step we will add a powerful search function to enable form users to search vendors prior to creating a request for a new vendor. An overview of the process is as follows:
- Create a search function in Winshuttle Query that searches for vendors.
- Create a vendor search group and associated fields in the form.
- Import the Winshuttle Query script into Composer and then configure it.
- Add a checkbox element to the Composer form that will invoke the search.
- Configure one or more rules that govern the search checkbox behavior.
On this page
- Create the vendor search script in Query
- Create the vendor search section of the form
- Import the vendor search script
- Configure vendor search fields
- Add a Web service for the search
- Add a vendor search button
- Add a rule changing lower case to upper case
- Test the search feature
Additional Resources
Create the vendor search script in Query
|
|
Create the search function using Winshuttle Query. The screenshot (right) shows the Output fields. Note that the Selection column checkbox is checked for match code fields.
|
|
|
|
|
Test the search in Winshuttle Query. Here we search for the term 'Acme' and the query successfully returns results. |
|
|
|
|
Map the fields to output to XML, and then save the file as Vendor Lookup.qsq. |
|
|


Create the vendor search section of the form
In this step we will create a group of form fields to use for the Vendor Lookup information. The end result should look something like this when we are finished:

Create the Search Existing Vendors Group
- In Composer, click the Form tab.

- Click the Originator tab.

- On the ribbon, click New Group.

- In the Properties pane, click Elements.
- Under Basic Elements, click Textbox.2 times to create 2 new text boxes.
- In the Properties pane, under Container Elements, click Repeating Table.
- In the New Repeating Table dialog box, under Number of Columns, type 4, and then click OK.
At this point the newly added group should look like this:

In the remaining steps, we will format the new group and rename its elements.
- Click the Group Label, click the placeholder text, and then replace it with Search Existing Vendors.

Optional: Make the Search Existing Vendors text more prominent and easier to see. On the Composer ribbon, click the Increase Font icon (
 ) twice.
- Below Search Existing Vendors, click Label (click to edit), and then replace the text with Vendor Name, as shown below.

- Below Search Existing Vendors, click Label (click to edit), and replace the text with City Name, as shown below.

- In the Repeating Table, rename each of the headers as described below:
Header 1: Click and rename to Name of Vendor.
Tip: You can press the Tab key to move to the next header and rename it.
Header 2: Rename to City
Header 3: Rename to Country
Header 4: Rename to Account Number

As the last step, we will move the Vendor Search section above the Basic Vendor Information group.
- Right-click the Search Existing Vendors group, and then click Move Up. Repeat this step until the Search Existing Vendors group is just below the Requester Information group.
The end result should look something like this:

Import the vendor search script
- In Composer, click the Solution tab.

- In the Solution pane, right-click Query Scripts, and then click Import.

- Click Choose File, and then browse to the folder location of the Vendor Lookup.qsq file.
- Click Open, and then click Next.
- In the Confirm dialog box, click Yes.
- In the Field Mapping screen, set the following properties (leave others not listed at their default values):
- Description: VendorLookup
- Group Name: Lookup
- Mapping Name: Vendor Lookup
- Connection: Use the Logged in Windows Account

- Click Generate.
- You should see a Field Mapping screen similar to the one shown below. Click OK.
On the Field Mapping Parameter screen, click Generate Form Fields, and then click OK.

- Click OK to finish.
Configure vendor search fields
Now we will configure the input and output field bindings for our Vendor Search feature.
- Click the Form tab.

- In the Search Existing Vendors group, click the Vendor Name field.
- In the Properties pane, next to Binding, click the arrow and then select LikeOP from the list.

- In the Search Existing Vendors group, click the City Name field.
- In the Properties pane, next to Binding, click the arrow and then select LikeOP_1 from the list.

Now we will connect the Repeating table fields to the output generated by the Vendor Lookup Query.
- In the Search Existing Vendors group, click the Name of Vendor field.
- In the Properties pane, next to Binding, click the arrow and then select LFA1_Name_1 from the list.

- In the Search Existing Vendors group, click the City field.
- In the Properties pane, next to Binding, click the arrow and then select LFA1_City from the list.

- In the Search Existing Vendors group, click the Country field.
- In the Properties pane, next to Binding, click the arrow and then select LFA1_Country_Key from the list.

- In the Search Existing Vendors group, click the Account Number field.
- In the Properties pane, next to Binding, click the arrow and then select LFA_Account_Number_of_Vendor_or_Creditor from the list.

Add a Web service for the search
In order to activate the Vendor Search function in our form, we need to add a Web Service element to it.
This Web Service is the Vendor Lookup Query we imported into the solution earlier in this section. Now we need to add a Web Service and connect it to the Query. In later steps we will create a button that activates this Web Service.

To add and configure the Web service:
- In Composer, click the Form tab.
- In the Properties pane, click Elements.

- Click Advanced Elements, and then click Web Service.

- Below the View tab, click the WebService element.

- In the Properties pane, set the following properties for the Web Service element:
- Name: (Optional) Type a name for the service (such as SAPWebService-VendorLookup), or you can leave the default name.
- Web Service: Click the arrow, and then select Vendor Lookup from the list.
- Invoked by Rule: Check the box.

Add a vendor search button
Now we will add a button to the form that invokes the Vendor Search function.
- Click the Form tab.
- Click the Search Existing Vendors group.
- In the Properties pane, click Elements.
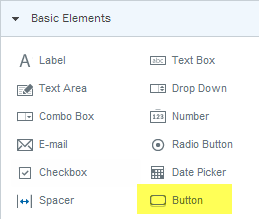
- In the Properties pane, click Basic Elements, and then click Button.
- In the Form Canvas, in the Search Existing Vendors group, click the button element you just inserted.

- In the Properties pane, configure the following properties:
- Name: Search_Vendors
- Label: Search Vendors
- Button Behavior: Click the arrow, and select Custom from the list. (This will show the Rules option as show below.)

- Next to Rules, click the Options button. [...].
- Click Add, and then click Rule Wizard.
- On the Create Rule screen, set the following properties:
- Label: Type a name (for example, CallWebService) for the rule.
- Type: Click the arrow, and select Actions from the list.
- Click Add.

- On the Add Rule Action screen, set the following properties:
- Action: Click the arrow, and then select Execute Web Service from the list.
- Web Service Control: Click the arrow, and then select VendorLookup from the list.
Tip: The name of the Web Service Control you select here should be the same one created when you imported the vendor search script (in case it's different from our sample screens/steps).

- Click OK.
- On the Create Rule screen, click OK.

- On the Rules Editor screen, click OK to finish.
Add a rule changing lower case to upper case
The Vendor Name Search field must be upper case for SAP. To accommodate this, we will add a rule/formula to change the lower case values to upper case.
- Click the Form tab.
- In the Form Canvas, click the Vendor Name field.

- In the Properties pane, next to Rules, click the Options[...] button.

- In the Rules Editor screen, click Add,and then click Rule Wizard.
- On the Create Rule screen, set the following properties:
- Label: Type a name (for example, MakeUpperCase) for the rule.
- Type: Click the arrow, and select Actions from the list.
- Click Add.
- On the Add Rule Action screen, set the following properties:
- Action: Click the arrow, and then select Set a Field Value from the list.
- Field: Click the arrow, and then select the name of the field to which the Search Vendor field is bound to. For this tutorial, the Search Vendor field was bound to the LikeOp field, which was configured in the step Configure vendor search fields.

- Click the Function F(x) button.
- On the Insert Formula screen, click Insert Function.

- On the Insert Function screen, under Functions, click the arrow and then select toUppercase from the list.

- Click OK.
- On the Insert Formula screen click in the formula, and then select and delete the word text.

- With the cursor in between the (), click Insert Field Value.
- On the Select a Field screen, expand Lookup, Lookup_Input, and then click on LFA1_SEARCH_TERM_FOR_MATCHCODE.
What we are doing here is adding a formula that acts upon the Vendor Search field and then converts the input to upper case after the data is entered by the user.
- The end result should look like this:

- Click OK.

- Click OK.

- Click OK.
- Click OK to finish.
Test the search feature
We should now have a fully functional search function built into the form. Publish the solution to your development environment, and test the search function to make sure it works.