Upgrading Winshuttle Workflow from earlier versions
Related Topics
Notes:
- Applies to Foundation 12.0 and later - In workflow archiving, a background job makes a copy of the form to attach to the SharePoint item. Normally, this is a sequential process in which one form is processed, the mht file is attached, and the next form is taken from the queue to be processed. In order to support large loads, a new global configuration key has been added for Foundation 12.0 and later. This key can be configured up to the maximum number of cores allocated to the SharePoint servers, allowing one create mht job thread per core. Configuring for the max core allowance may put additional strain on your server’s processing ability. For this reason, you need to balance usage against your archiving throughput needs. Keep in mind that create mht jobs work the oldest completed processes first.
- If you are upgrading from Foundation 10.x to 11.2, you must first upgrade from Winshuttle Workflow 10.9 Hotfix 1 to Winshuttle Workflow 11.1.0, and then upgrade Winshuttle Workflow 11.1.0 to Winshuttle Workflow 11.2.x.
-
While upgrading Workflow from 11.x to 12.x, if you encounter the following error (in the screenshot), follow the remedial actions mentioned below.
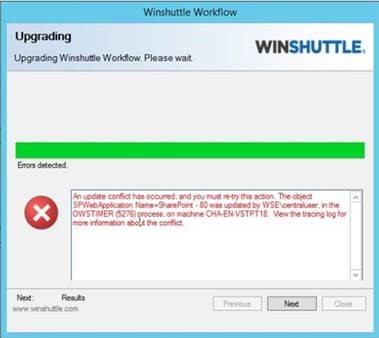
Root Cause
- The timer service job gets stuck in any server
- Mismatch in MS SharePoint cache (for example mismatch in the file system cache with the contents of the configuration database)
Remedial Action
- Restart the timer service job.
- Clear the SharePoint configuration cache.
- If you are upgrading to the latest Microsoft SharePoint Cumulative Update (CU) or a SharePoint patch, while using or upgrading any Foundation version earlier than 12.0, you must perform the workaround mentioned below. This workaround enables you to view all the drop-down options in the Context menu of the task list item.In case you have performed a Foundation upgrade first, and then performed an upgrade to the Microsoft SharePoint CU or the SharePoint patch update, the workaround is not required.
Workaround:
- Log in to the Microsoft SharePoint server of your organization.
- Go to the following path: C:\Program Files\Common Files\microsoft shared\Web Server Extensions\15\TEMPLATE\LAYOUTS\1033\string.js
- Edit the strings.js file by removing the following characters: \ : < > ? / + | �.','svform=function(){}; and save the file.
On this page
- Upgrading from Winshuttle Workflow 11.2.0 to Workflow 11.2.5
- Upgrading from Workflow 11.1.x to 11.2.x
- Upgrading from Workflow 10.9 Hotfix 1 and later to Workflow 11.1.x
Upgrading from Winshuttle Workflow 11.2.0 to Workflow 11.2.5
Note: Use Task Scheduler to disable any scheduled SVService jobs on the server before upgrading.

- Right-click the Setup/Installler, and then click Run as administrator.
- Check Continue Setup, and then click Next.
- After the System Check is complete, click Next.
- On the Installed Locations screen, click Next.
- On the Upgrade or Remove screen, select Upgrade and then click Next.
- On the Winshuttle Workflow Database screen:
- Select Trusted to use the credentials for the currently logged in Windows account to install the upgrade.
OR - Select SQL Authentication to enter a SQL username and password (with appropriate permissions) to install the upgrade.
- After the upgrade has completed, click Next, and then click Close.
- At the web app level, deactivate Winshuttle Workflow, and then reactivate it.
- Run the Front End Configuration from Workflow Administration Site and select all the web front ends on which Workflow will be configured. Front End Configuration will configure all the web front ends at the same level.
Upgrading from Winshuttle Workflow 11.1.0 to Workflow 11.2.x
Note: Use Task Scheduler to disable any scheduled SVService jobs on the server before upgrading.
- Right-click the Setup/Installler, and then click Run as administrator.
- Check Continue Setup, and then click Next.
- After the System Check is complete, click Next.
- On the Installed Locations screen, click Next.
- On the Upgrade or Remove screen, select Upgrade and then click Next.
- On the Winshuttle Workflow Database screen:
- Select Trusted to use the credentials for the currently logged in Windows account to install the upgrade.
OR - Select SQL Authentication to enter a SQL username and password (with appropriate permissions) to install the upgrade.
- After the upgrade has completed, click Next, and then click Close.
Upgrading from Winshuttle Workflow 10.9 Hotfix 1 (and later) to Workflow 11.1.x
Back to top- Run Winshuttle Workflow Installer with Administrator privileges.
- Check Continue Setup, and then click Next.
- On the System check screen, click Next.
- On the Installed Locations screen click Next.
- Select Upgrade, and then click Next. Note: The specified account will be verified to exist in the required groups on all the Web Front Ends.
- On the Winshuttle Workflow Database screen, select Trusted or SQL Authentication for the account used to create the database. If SQL is selected, provide the Username and Password. Click Next.
- The upgrade process should begin. During the upgrade process, the following actions are performed in the background and in the following order:
- Workflow Configurations are validated
- The database is configured
- Temporary Cache folders are cleaned
- The Webapp Feature is deactivated
- Jobs are created and then run to retract the solution from all web applications
- The solution is removed from the SharePoint Solutions Store
- The SharePoint Timer service is restarted on all Workflow Front Ends
- The solution is added to the SharePoint Solution Store
- Version numbers are registered
- The solution is deployed to the Web Apps
- The history viewer solution is deployed to the SharePoint Solution Store
- A policy is added to the Workflow Admin Account
- The Webapp feature is re-activated
- The Winshuttle Workflow Administration Site is re-created
- Workflow Tools are installed
- Workflow shortcuts are created
- Once the upgrade is complete, click Next.
- On the Summary screen, click Close.
Verifying a successful Winshuttle Workflow upgrade
- Go to the Workflow Administration page.
- Refresh the page.
- In the bottom-right part of the screen, you should see the new Workflow version number.
Completing the Winshuttle Workflow upgrade
To complete the upgrade process, you must associate Workflow and Composer with the new Foundation environment.
- Open your the newly upgraded Foundation Site.
- Click Settings, and then click Foundation Setup.
- Enter the new URLs for the Administration URL and the Composer URL, and then click Save.

- Enter the URLs to the Form sites, and then click Save.
