Applies to:
Creating or migrating the database for Winshuttle SAP Integration Server 11x
Winshuttle Server 11.x Admin Tool Guide
Use the Migration tab to:
- Configure a new database for Winshuttle SAP Integration Server 11.x Server or Worker.
- Migrate from one SQL or SQLite database to another
On this page
- Creating a new SQL Server database for Server MANAGER or WORKER
- Creating a SQLite database for Winshuttle Server WORKER
- Migrating databases
Creating a new SQL Server database for Server Manager or Worker
Back to top
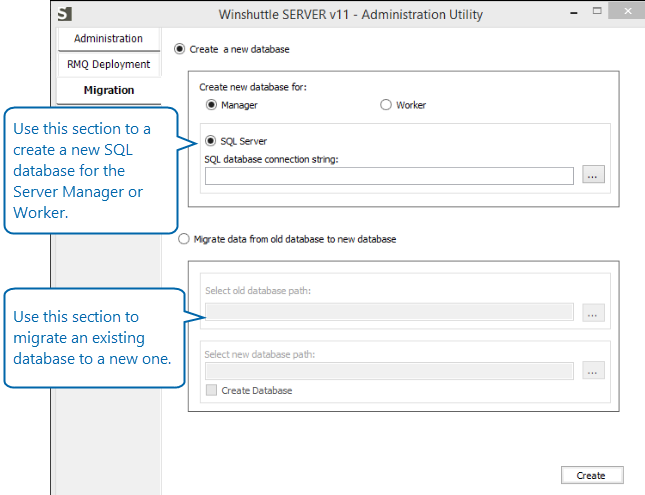
- Click Create a new database file.
- Under Create a new database for, select Manager or Worker.
- Next to Select new SQL database path, click [...]
- In the Connect to SQL Server dialog box:
- Server Name: Type a name for the server, or select one from the menu.
- Database Name: Type a name for the database.
- Authentication: Select an authentication type (Windows or SQL Server)
- Server Username: If you are using SQL Server authentication, type a username with appropriate permissions to create the database
- Password: Type the password for the username specified in the previous step.
- Click OK.
- Click Create.
Creating a SQLite database for Winshuttle Server WORKER
Back to topNote: SQLite is an option available for the Server Worker database, not for Server Manager database.
- Click Create a new database file.
- Under Create a new database for, select Worker.
- Select SQLite.
- Next to Select new SQL database path, type a path/filename for the SQLite database. (Or, you can click [...] to browse to a location, and then type a filename.)
- Click Create, and then click OK.
Migrating databases
Back to topNote: You can only migrate existing 10.7 Hotfix 2 or v11.1 databases to a new v11.1 databases.
- Click Migrate data from old database to new database.
- Next to Old database path, click [...] to connect to the database you wish to migrate.
- Next to New database path, click [...] to connect to the new database. Or, you can also check Create database if the database has not yet been created.
- In the Connect to SQL Server dialog box:
- Server Name: Type a name for the server, or select one from the menu.
- Database Name: Type a name for the database.
- Authentication: Select an authentication type (Windows or SQL Server)
- Server Username: If you are using SQL Server Authentication, type a username with appropriate permissions to create the database
- Password: Type the password for the username specified for Server Username (above).
- Click Next.
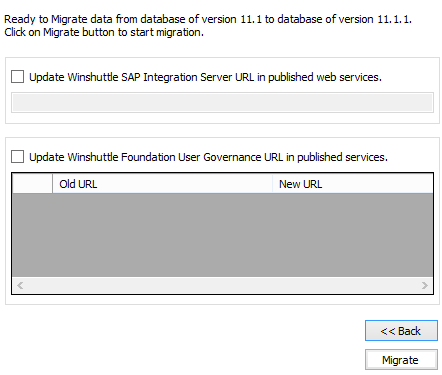
- [Optional]: On the Data Migration screen, select one (or both) of the following options:
- Update Winshuttle SERVER URL in published web services.. Use this option to move all Winshuttle Manager Web services to a new server URL. Enter the new URL into the provided field.
- Update Winshuttle Foundation User Governance URL in published Services. Use this option to move published services from one Winshuttle Foundation User Governance site to another. You can click any entry in the New URL column to change it.
Note : The user account running the Migration Utility must have the Central Application Administrator role. In addition, the URL used to update Winshuttle User Governance must be a valid v11.1 URL.

- Click Migrate.
