Applies to:
- Winshuttle Foundation
Extending Winshuttle Workflow
Back to
Server Admin topics
Use the Extend Workflow page to:
For example, if you have 2 business units (HR and Finance) that each need to use Winshuttle Workflow, and each unit uses a different Web application, you would 'Extend' Winshuttle Workflow to each Web application used by each business unit.
Extending Winshuttle Workflow
- Open the Workflow Administration site.
Note: Your account must have the appropriate permissions to extend a workflow.
- Under Server Administration, click Extend Workflow.

- On the Workflow Administration site: Extend Workflow page, do the following:
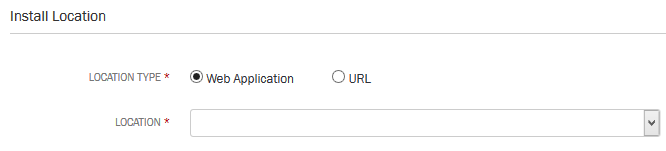
- Under Install Location:
- Next to Location Type, select Web Application or URL
- Next to Location, enter the address to the Web application or URL you wish to extend. For example: HTTP://mywebservice.com.
- Under Database Settings, fill in each of the following fields:
Note: This database account will be created for you by the installer and used by Winshuttle Workflow when the database is accessed. You can also choose to use the same Workflow database from a previous Winshuttle workflow installation, or specify a new one.
- Database Instance Name: Enter the name of the database instance
- Database Name: Enter the name of the database.
- Authentication Type: Select SQL Server or Windows Authentication.
- Authentication: Enter the username, password, and domain. (Note: Domain is only required if you are using Windows authentication.)
- Under Database Initialization Settings, do the following:
Note: The credential supplied for Database Initialize Settings much have sufficient rights to create new databases. Note that this account will only be used to create the Winshuttle Workflow database during this installation.
- Select SQL Server or Windows Authentication.
- Enter the username, password, and domain for an account with sufficient permissions to create new databases (i.e. dbcreator and security admin permissions in SQL Server). (Note: Domain is only required if you are using Windows authentication.)
- Click Extend. You should see a message similar to the following:

Now that the workflow has been extended, you need to activate the Winshuttle Workflow feature from the SharePoint Central Administration site (see below).
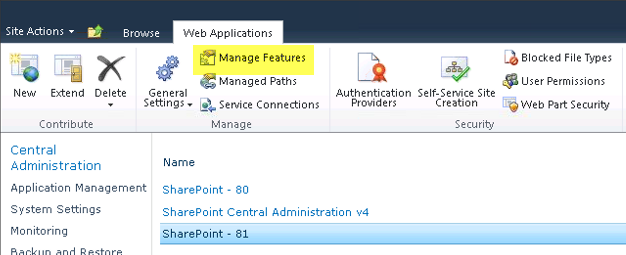
Activating the Winshuttle Workflow from SharePoint Central Administration
Back to top- Open the SharePoint site. This will be the site displayed in the 'success' message from the previous section:

- Click the Web Applications tab.
- In the Name column, select a Web application.
- Click Manage Features.
- Click Activate, and then click OK.
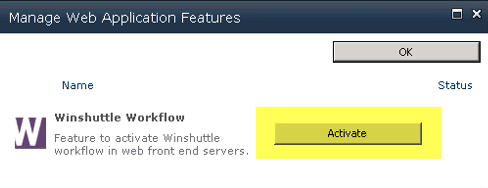
Note: After activation, if you need de-activate Winshuttle Workflow please wait 1-2 minutes so any/all background operations on all servers of the SharePoint Farm can be completed.