Applies to:
- Winshuttle Foundation
Using the Winshuttle Workflow Form Library
Form workflow topics
From the Winshuttle Form Library, you can search forms, create new ones, view a form's history, and more.
On this page
- Searching forms
- Starting a new form
- Displaying a form
- Resubmitting a form
- Copying a Form
- Viewing form history
- Changing the Winshuttle Form Library Web Part appearance
- Web part configuration options (table)
Overview: The Form Library
Back to top
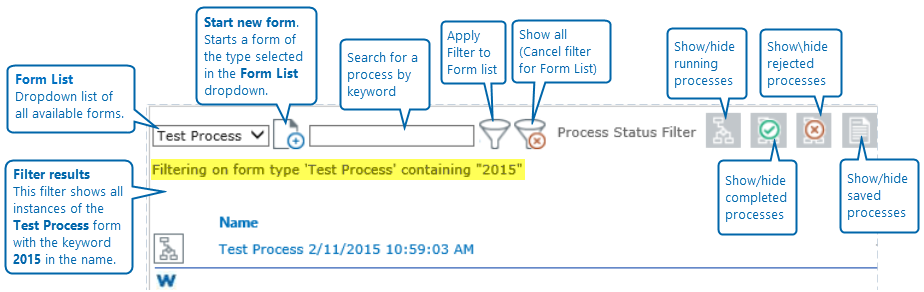
- Form List: A dropdown list of available forms.
- Start New Form: Start a new form of the type currently selected in the Form List drop down.
- Search by keyword: Search for a process by keyword.
- Filter/Cancel Filter: Use these buttons to apply your filter to search results, or cancel the filter (show all).
- Process Status Filter: Use these buttons to filter results by Running, Rejected, Completed, or Saved processes.
Note: Filters that are showing results show up with a dark gray background.
All forms are recorded in the corresponding SharePoint list that is created when a form is published in Winshuttle Workflow. The form instances shown in the List View are the ones you have submitted. Administrators can see all forms in the list.
TIP: To display all of the forms in the list to all users, login as an Administrator and modify the Read Access property of the Item Level Permissions in the list settings.
Filtering by Form Type
- Click the Form List dropdown, and then select the form type from the dropdown.
- Click the Filter
 button.
Clearing Filters
Click the Clear Filter ![]() button to clear filters.
button to clear filters.
Note: The Clear Filter button does not reset the Process Status Filter toggle buttons.
Sorting a form list
- Click the Column Header (ie. Name) to sort a list in Ascending order.
- Click the Column Header again to sort in Descending Order.
Filtering by status
- In the Process Status Filter bar, click the toggle button (Left to right: Running, Rejected, Completed, Saved) that you wish to sort by.

- Click the toggle button again to change states.
Searching by keyword
- Click the Form List dropdown, and then select the form type from the dropdown.
- In the keyword field, type a keyword or keywords.
- Click the Filter button.
Starting a New Form
Back to topAavailable forms are listed in the drop-down list in the Winshuttle Form Library.
- Choose a form type from the Forms list.
- Click the New Form button.
- If necessary, make changes, additions, or supply information in the form.
- Click Save and Route.
The contents of the form are recorded and the form is routed based on its associated workflow.
NOTE: If you are starting an offline form, double-click on the offline form .XSN file, complete the form, save it as XML, and email it to the email address for starting forms given to you by your System Administrator.
Resubmitting a Form
Back to topYou can resubmit a form, for example, if it was previously rejected or if incorrect information was entered. You can makes changes or corrections to the form as needed, then resubmit it for approval.
NOTE: Only the Originator of the form can resubmit the form.
To resubmit a form:
- In the Winshuttle Form Library, place the cursor over a rejected task that you want to resubmit, click the drop-down arrow to the right of the form name, and select Resubmit from the Winshuttle menu.
The form appears.
- Make changes to the form as needed.
- Click Save and Route.
Displaying a Form Instance
Back to topYou can display a completed form, along with a detailed view of the tasks in the workflow and printing options.
To display a form instance:
- In the Form View, place the cursor over the form instance you want to display.
- Click the drop-down arrow to the right of the item name.
- Select Show Form from the drop-down menu.
Copying a Form
You can start a new form from an previous submission, created using the same form version. This helps save time when a lot of requests are to be created with recurring data.
If the current form version is different than what was used in the previous submission, the Copy Form feature will not work as expected. It is thus advised to always refer to the latest version of the Form for copying data.
Viewing Form History
Back to topYou can display a detailed account of a form as it was being routed, including the participants in the workflow, their comments, and the assigned/completed date of their tasks.
To view form history:
- In the Winshuttle Form Library, place your cursor over the form for which you want to display history.
- Click the drop-down arrow to the right of the form name, and then select Winshuttle History from the Winshuttle menu. The history information appears.
NOTE: You can choose a form in the main list, or a form in the Winshuttle Process List.
Modifying the Winshuttle Form Library Web Part
Back to topThe Winshuttle Form Library Web Part can be configured with several options to determine how and what it displays. If you are an Administrator, the changes you make will apply to all users who access this FormEx site. If you are not an Administrator, the changes only apply to your view of the FormEx site.
NOTE: Administrators have access to all Web Part options. Non-Administrators have access to only some of the Web Part options.
To modify the Winshuttle Form Library Web Part:
- Go to the FormEx site for which you want to modify the Winshuttle Form Library Web Part.
- Click the drop-down arrow at the top right of the Winshuttle Form Library Web Part, and select one of the following from the drop-down menu:
- If you are an Administrator, select Edit Shared Web Part. The changes you make will apply to everyone who accesses this FormEx site.
- If you are not an Administrator, select Edit My Web Part. The changes you make will apply only to you.
The Web Part Settings area appears.
- Expand the Winshuttle Settings section to display the settings you can modify.
- Modify the forms settings as desired.
Consult the table below for descriptions of available options.
- Click Apply.
- Click OK.
Web part configuration options
Back to topThe following table describes Web part options, and which options can be edited by standard users (i.e. not administrators).
Administrators can edit all available Web part options.
Setting |
Description |
Configurable by standard user? |
|
Columns |
The form list columns that are displayed in the Web Part. Multiple columns can be displayed by separating their names with a comma (such as Type, Name, State, Revision). |
No |
|
Columns Sortable |
Specifies whether or not the columns specified in the Columns setting (above) can be sorted. |
No |
|
Completed View |
Toggles the display of completed forms. |
No |
|
Creation Date Format |
The format to use when displaying the due date in the Web Part. This is the standard .NET date formatting functionality to use for displaying the date the form was created. |
Yes |
|
Day Limit |
The number of days to use in filtering what is displayed. Any form greater than the number of days specified will not be shown. If the value is -1, all items will be displayed. Note: Beginning in Workflow version 10.9 and later, this property is not supported when Dynamic Refresh is enabled. |
Yes |
|
Dynamic Refresh |
Dynamically updates the web parts without reloading page or resubmitting data. If Dynamic Refresh is ON, the Form Library functionality changes as follows:
|
Yes |
|
Form Site |
The URL for the site where the forms list resides. Can be absolute or relative. If this field is left empty, the current site is used. |
No |
|
Form Type |
Limits the forms displayed to what is specified in this field by form name. Multiple form types can be displayed by separating their names with a comma (such as MOC, PTO, Purchase Requisition, New Employee). This option is similar to the Filter On Form Type option, which is manually activated by the user. Note: Beginning in Workflow version 10.9 and later, this property is not supported when Dynamic Refresh is enabled. |
No |
|
Maximum to Display |
The number of documents to display before pagination of the listings begins. |
Yes |
|
Overflow Behavior |
How the Web Part should behave if the number of items exceeds its boundaries on the screen. Select one of the following options:
Note: Beginning in Workflow version 10.9 and later, this property is not supported when Dynamic Refresh is enabled. |
Yes |
|
Rejected View |
Toggles the display of rejected forms. |
No |
|
Running View |
Toggles the display of forms that are in route. |
No |
|
Saved View |
Toggles the display of saved forms. |
No |
|
Scrolling List Height |
The height in pixels that the Web Part should use if the Overflow Behavior (see above) is set to Scrolling. Note: Beginning in Workflow version 10.9 and later, this property is not supported when Dynamic Refresh is enabled. |
Yes |
|
Show Creation Date |
Toggles display of each form’s creation date. |
Yes |
|
Show Day Limit Control |
Specifies whether to show Day Limit Control on Form Library Web part so the items can be filtered based upon a number of days. |
Yes |
|
Show Description |
Toggles the default display of the Description column. |
No |
|
Show Filter |
Whether or not to display the filter control, which allows the user to specify a string to use in filtering the display. |
No |
|
Show Process Hierarchy |
Hides forms/processes with a parent form/process, and displays an expand [+] icon next to any form/process with a child form or process. |
No |
|
Show Type |
Toggles the display of a column showing the form type. Note: Beginning in Workflow version 10.9 and later, 'Show type' is not supported when Dynamic Refresh (see above) is enabled. |
Yes |