Applies to:
- Winshuttle Foundation
Using the Winshuttle Task List for forms
Form workflow topics
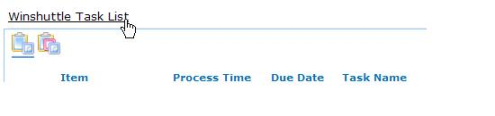
The Winshuttle Task List is the section of a FormEx site that displays workflow tasks currently assigned to you for all SharePoint items being routed (including forms).
On this page
- Viewing task history
- Completing an assignment
- Completing multiple assignments
- Filtering the task list view to display specific task types
- Modifying the task list Web part
- Web part configuration options (table)
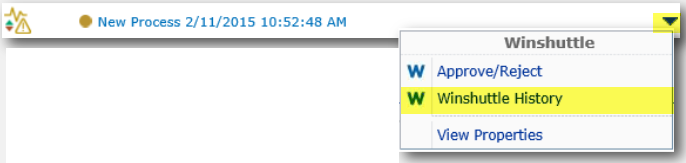
Viewing Task History
Back to topYou can view your tasks for only the current FormEx site, or click the All Sites button to display your tasks for all FormEx sites to which you belong.
NOTE: By default, items listed in yellow are due within seven days and items listed in red are overdue.
- In the Winshuttle Task List, hover over the Task you wish to view and then click the drop arrow.
- Click Winshuttle History.
Completing an assignment
Back to topTo complete a task assignment:
- In the Winshuttle Task List, place the cursor over the task you want to complete, click the drop-down arrow to the right of the item name, and select Approve/Reject from the Winshuttle menu.
The Winshuttle Complete Form Web Part appears. The form is in read-only format so that data cannot be edited.
- If appropriate, type any comments in the Comments text box.
Depending on the node and the settings for its Comment Requirement property, comments will be either optional or required.
- Click either Approve or Reject .
Completing multiple assignments
Back to topIf you have been assigned a task that is eligible for Bulk Approval, you can complete multiple assignments in one step.
NOTE: See the Configuring Bulk Assignment Approvals and Reassignments in Winshuttle Designer for more information about enabling Bulk Approval on a per-node basis.
To complete more than one assignment at one time:
- Click the Winshuttle Task List header.
- The Winshuttle Task List detail page displays.
- From the View list on the right, select Bulk Approval.
- From the drop-down list, select the form list for which you want to complete multiple assignments.
A list of available assignments displays.
- For each assignment that you want to complete, select either the Approve or Reject checkbox.
- Click Complete Selected.
Filtering the Task List view to display specific task types
Back to top- Go to a FormEx site and click Winshuttle Task List.
- From the View list, select the view you want to use:
- Active Tasks—presents all of your tasks that are currently running.
- Due Today—presents all of your tasks that are due today.
- Bulk Approval—allows you to approve or complete multiple items. Bulk Approval must be enabled in a workflow task in order for it to display in this view. See the Winshuttle Designer Process Guide for more information,
- All Tasks—presents all of your tasks.
Modifying the Winshuttle Task List Web Part
Back to topThe Winshuttle Task List Web Part can be configured with several options to determine how and what it displays. If you are an Administrator, the changes you make will apply to all users who access this FormEx site. If you are not an Administrator, the changes only apply to your view of the FormEx site.
NOTE: Administrators have access to all Web Part options. Non-Administrators have access to only some of the Web Part options.
To modify the Winshuttle Task List Web Part:
- Go to the FormEx site for which you want to modify the Winshuttle Task List Web Part.
- Click the drop-down arrow at the top right of the Winshuttle Task List Web Part, and select one of the following from the drop-down menu:
- If you are an Administrator, select Modify Shared Web Part. The changes you make will apply to everyone who accesses this FormEx site.
- If you are not an Administrator, select Modify My Web Part. The changes you make will apply only to you.
- Expand the Winshuttle Settings section to display the settings you can modify.
See Web Part Configuration Options (below) for descriptions of available options.
- Modify the Winshuttle Workflow settings.
- Click Apply, and then click OK.
Web part configuration options
Back to topThe following table describes Web part options and which options can be edited by standard users (i.e. not administrators).
Administrators can edit all available Web part options.
Setting |
Description |
Configurable by standard user? |
|
Columns |
The document library columns that are displayed in the Web Part. Multiple columns can be displayed by separating their names with a comma (such as Type, Name, State, Revision). |
No |
|
Due Date Format |
How to format due dates that show in this Web Part. This is the standard .NET date formatting functionality. |
Yes |
|
Dynamic Refresh |
Dynamically updates the web parts without reloading page or resubmitting data. |
Yes |
|
Empty Message |
The message to display when there are no assignments. |
No |
|
Filter |
An expression to use to filter the assignments that will be shown. This should be a Boolean expression that indicates whether or not to include the item. SharePoint column names can be used in the expression, as well as workflow meta data properties. The condition syntax is the same as the syntax used for transitions within a Composer workflow (e.g., [Cost] > 1000 && [opRev2] == "yes"). |
No |
|
Maximum To Display |
The number of documents to display before pagination of the listings begins. |
Yes |
|
Overflow Behavior |
How the Web Part should behave if the number of items exceeds its boundaries on the screen. Select one of the following options:
Note: PreviousAndNext mode is generally recommended for the best performance.
|
Yes |
|
Scrolling List Height |
The number of pixels that the Web Part should be set to if the Overflow Behavior is set to Scrolling. |
Yes |
|
Show Color Warnings |
Displays the color warnings for your assignments. Yellow tasks are pending and red tasks are overdue. |
Yes |
|
Show Due Date |
Displays the due date for your task. |
Yes |
|
Show Logged In As |
Indicates whether or not to show the name of the currently logged in user in the footer of the Web Part. |
Yes |
|
Show Process Time |
Displays the time the process was initiated. |
Yes |
|
Show Search |
Indicates whether or not to show the search control in the Web Part. This control is a text box and button that searches for a string in the Assignments. |
Yes |
|
Show Site Control |
Indicates whether to show the control on the left that allows you to display assignments for only the current site or for all sites. |
No |
|
Show Sites |
Displays the site the task originated from. This is only displayed if the AllSites feature is activated, either by default through the Site Scope feature, or manually by the user via the AllSites option. |
Yes |
|
Show Task Name |
Indicates whether to include a column in the Winshuttle Task List that shows the name of the task, which is the name of the node in the workflow. |
Yes |
|
Site Scope |
Select one of the following options:
|
No |
|
Sort Column |
The name of the column to sort by in the default view of the Web Part. |
No |
|
Sort Direction |
The default direction for the default sort. |
No |
|
Validate SharePoint Items |
Indicates whether the Web Part should validate that, each item against which a process is running actually exists. If this option is turned on, it will take longer to render the Web Part, since each item has to be validated. If it is off, the Web Part will render more quickly, but there could be invalid items. (The system will handle this properly and give a message that the item no longer exists.) |
No |