Set up the Reporting Data Warehouse
Prerequisites
- You must use Foundation v12 or later.
- License Management System (LMS) must be installed, and the Dashboard component must be selected during the LMS installation. If you have not selected the Dashboard component initially, you can enable it by running the LMS installer again.
- The Workflow DB, LMS DB, and the Reporting Dashboard DB must be on the same SQL server.
- You must have the Reports Administrator role to set up the Reporting Dashboards. For more details on how to add the Reports Administrator role to a user, see Edit or Delete users.
- You must replace the <Deny Users/> tag with <allow users="domain/username"/> tag in the DWAPI web config file. This file can be found under the LMS installation directory in the DWAPI folder.
Procedure
- On the Foundation home page, go to Settings > Reporting DataWarehouse. The Dashboard Reporting Configuration page appears.
- Choose an initial/existing data import option. This option is only available on the first instance when reporting is enabled.
- Import all existing data - This option enables import of all existing data from the live application database into the Reporting database.
- Data archived from the Workflow application is not imported.
- Data from all the related processes is also imported.
- Winshuttle recommends scheduling the importing activity on a down time, because if the data volume is high, this process could take a long time.
- Not import existing data - This option does not perform import of any existing data. You will lose historical data if you choose this, as the initial data sync cannot be performed after the first instance of enabling reporting.
- On the Configuration tab, click the Enable reporting button.
- Select the sync strategy and time in the Sync Strategy and Sync Time fields respectively
- Data needs to sync between the Reporting database and the live application database. You can choose to schedule a regular sync starting a day and time by clicking the Schedule sync button or perform a sync immediately by clicking the Sync now button.
- Enter the duration for which you would want the data to live in the database, in the Time to live field.
Data Purge Policies:
- Data is deleted from the Reporting database permanently, after it stays in the database for this period. Maximum period that can be entered is 37 months. The query results may slow down if the data volume is high and the duration is very long. If you need to access the older reporting data, consider archiving.
- A recurring job called RptDataPurgeJob is scheduled to run on the first Saturday of every Month at 8:00 PM UTC. This job deletes expired data from system. Data is considered expired if its CompletionDate is before the first day of the current month.
- For example - Today's date is October 6, 2018 and the time-to-live duration is entered as 3 months. In this case the process data completed before 1st July 2018 will qualify for deletion.
- Parent/Child process behavior - For parent and child process scenarios the complete chain data with parents, child, and grandchild processes is validated. The job only deletes the parent/child process data when the complete process data chain is expired; it does not delete a parent process if any child or grandchild process in this chain is not expired. Also, when deleting a process data, the corresponding dependent data like assignment, performer is also deleted.
- Choose an organizational hierarchy option when:
- None - There is no requirement to create team-specific charts.
- Active Directory Sync - To be able to use the organizational hierarchy to design charts for different teams under different managers. Click Edit Settings, enter details in the following fields, and then click Save:
- Server Name
- Password
- User name - Provide any LDAP user with read access to the AD.
- Domain Name
- Organizational Unit - Example - DC =mydomain,DC=local
- Custom - When instead of using the AD, you want to manually update the user and team hierarchy information in the SQL tables in the Reporting database.
- Click Save.
Notes:
Note: The time selection is in the time zone you've set in the application time zone setting.
Disable Reporting
You can lose initial data if you enable and disable reporting, and then subsequently enable it again. As this option may lead to data loss, it is suggested you sync the initial data on the first instance of enabling reporting, and then cancel the data sync scheduled job.
To cancel the data sync job, do the following:
- On the Foundation home page, go to Settings > Reporting DataWarehouse.
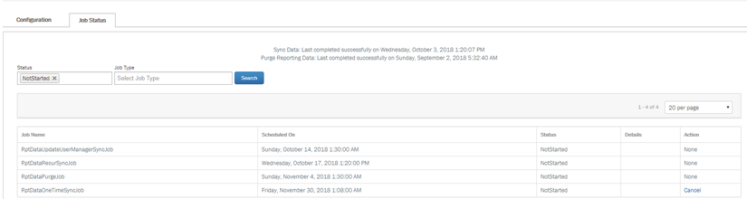
- On the Job Status tab, select RptDataOneTimeSyncJob in the Job Type field, and click Search. A table appears with all the schedules listed.
- Click Cancel under the Action column on the corresponding job.
4. You will be prompted to confirm the cancellation. Click OK.