Applies to:
- Winshuttle Foundation
Kerberos Configuration
Back to
Kerberos Configuration
These instructions will show you how to configure Kerberos as the authentication protocol for your SharePoint 2010 server that runs Winshuttle Central, Winshuttle Workflow, and Winshuttle Designer and Winshuttle Server services.
For reference, in the following example SharePoint, Winshuttle Central and Winshuttle Workflow are installed on one server (for example, SPServer) and Winshuttle Server is installed on another server (WSServer).
Configuring DNS for Winshuttle Server:
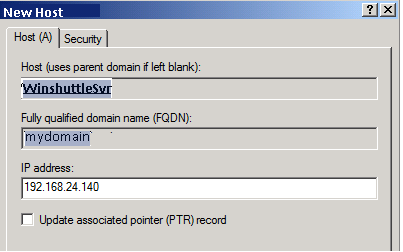
Back to top- Create a new DNS "WinshuttleSvr" which resolves to WSServer IP.
- In DNS, create an A record for your Winshuttle site’s IP address (displayed below).

Configuring Active Directory
Back to top- Create two user accounts to be configured in both machines:
- SharePoint Service Application Service Accounts: "mydomain\spuser1"
- Winshuttle Server application Service Accounts: "mydomain\wsuser1"
- Configure each web application to run in its own IIS application pool with its own security context (application pool identity).
|
Web Application |
IIS App Pool Identity |
|
SharePoint with Central |
mydomain\spuser1 |
|
Winshuttle Server |
mydomain\wsuser1 |
Configuring Service Principal Names (SPNs)
For each service account, configure a set of service principal names that map to the DNS host names assigned to each web application.
Important notes:
- For a Network Load Balanced environment (Software or Hardware), you must set SPNs for the NLB or cluster name instead of the individual server names.
- The SPN account on the default Port is mandatory even if the application is running on a different port.
|
DNS Host |
IIS App Pool Identity |
Server Principal Names |
|
SPServer.mydomain |
mydomain\spuser1 |
HTTP/SPServer HTTP/SPServer.mydomain |
|
WinshuttleSyr.mydomain |
mydomain\wsuser1 |
HTTP/WinshuttleSvr HTTP/WinshuttleSvr.mydomain |
To create the service principal names, run the following commands:
SetSPN -S HTTP/SPServer mydomain\spuser1
SetSPN -S HTTP/SPServer.mydomain mydomain\spuser1
SetSPN -S HTTP/WinshuttleSvr mydomain\wsuser1
SetSPN -S HTTP/WinshuttleSvr.mydomain mydomain\wsuser1
Note: The SetSPN command assumes both services are running on default port. If any application is running on a different port, it must be included in the setspn command. For example, if Winshuttle Server is running on port 8033, the following command should be used to create SPN
SetSPN -S HTTP/WinshuttleSvr mydomain\wsuser1
SetSPN -S HTTP/WinshuttleSvr.mydomain mydomain\wsuser1
SetSPN -S HTTP/WinshuttleSvr:8033 mydomain\wsuser1
SetSPN -S HTTP/WinshuttleSvr.mydomain:8033 mydomain\wsuser1
Configure Kerberos constrained delegation for computers and service accounts
Back to topConfigure user spuser1 for delegation below Services Principal Names
|
Principal Type |
Principal Name |
Delegates to Service |
|
User |
Spuser1 |
HTTP/WinshuttleSyr HTTP/WinshuttleSyr.mydomain |
Configuring delegation
- Open the Active Directory Users and Computer snap-in.
- For the user spuser1, select Trust this user for delegation to specified services only and Use Kerberos only.
- Click Add to add the services that the user (service account) will be allowed to delegate to. To select an SPN, look up the object the SPN is applied to. In this example, we are trying to delegate to an HTTP service which means we search for the service account "wsuser1."
- In the Select Users or Computers dialog box, click Users and Computers, search for the IIS application pool service accounts (in our example mydomain\wsuser1) and then click OK. You will then be prompted to select the services assigned to the objects by service principal name.
- In the Add Services dialog box click Select All, and then click OK.
Note: when you return to the delegation dialog you may not automatically see all the SPNs selected. To see all SPNs, select the Expanded check box in the lower left hand corner.
Configuring SharePoint Server
Back to top- Create a web application on SPServer which will be used for Central and Workflow. In this example, we created this application on the default port, as SPN are created considering the default port. The settings are given in the following table.
Item
Setting
Setting
http://SPServer Web Application
Authentication
Classic Mode
IIS Web Site
Name: SharePoint - Portal - 80
Port: 80
Security Configuration
Auth Provider: Negotiate
Allow Anonymous: No
Use Secure Socket Layer: No
Application Pool
Name: SharePoint - Portal80
Security Account: mydomain\spuser1
- Create a new site collection for Central and install Workflow on this site.