Applies to:
- Winshuttle Foundation
6-3. Add an address validation Web service
Back to
Steps in this phase
In this step we will add another button to the form that will call a Web service to validate the address entered into the form.
We will do the following:
- Add an Address Validation group to the form.
- Add a Validate Address button to the form.
- Add a Web Service element and connect it to an external SOAP Web service.
- Connect the Web Service to the Validate Address button.
- Create Rules to make it all work.
On this page
- Create the address validation group
- Format the address validation group and elements
- Import and configure a Web service
- Add a Web Service element to the form
- Connect the Web service to address validation button
- Create address validation rules
- Set field default values
Create the address validation group
In this step we will create a group of form fields to use for the Vendor Lookup information. The end result for should look something like this when we are finished:
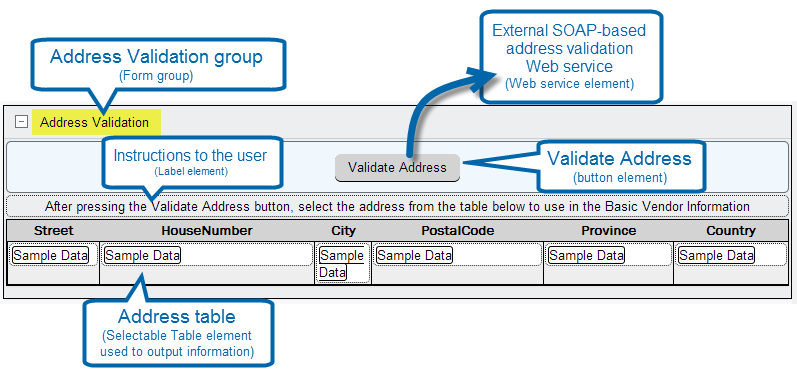
Creating the Address Validation Group
- In Composer, click the Form tab.

- Click the Originator tab.

- On the ribbon, click New Group.

- In the Properties pane, click Elements.
- Under Basic Elements, click Button. (This will be the Validate Address button.)
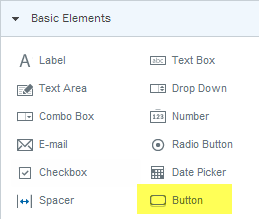
- Under Basic Elements, click Label. (This label will be used to display some simple instructional text.)
You should now have a basic group with a button similar to the following example:

Format the address validation group and elements
- Click the Group Label, delete the placeholder text, and then type Address Validation.

- Below Address Validation, click the Button.

- In the Properties pane, next to Label, type Validate Address. (Note: This will automatically change the Name property to Validate_Address.)
- Right-click the Address Validation group, and then click Move Up. Place it just below the Basic Vendor Information group.
Import and configure a Web service
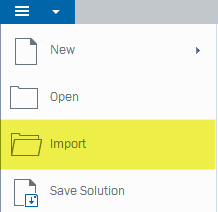
- In Composer, click the Start button, and then click Import.
- On the Import screen, click URL, and then enter the address for the Web service.
For this tutorial we are using the Address Doctor Web service at this URL: http://validator2.addressdoctor.com/addInteractive/Interactive.asmx?WSDL
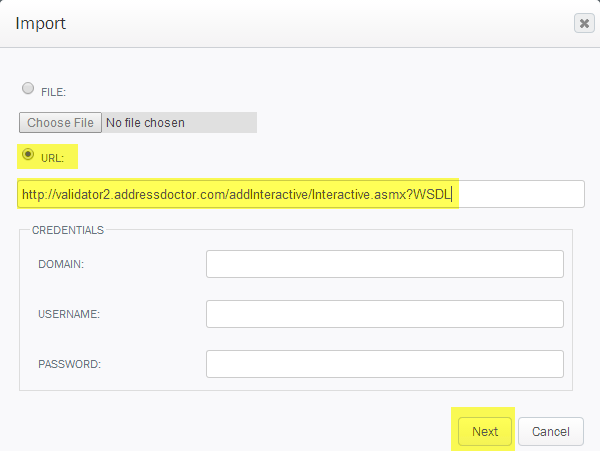
- The Web service should appear at the bottom of the screen if the connection is successful. Click Next.

- Click Yes to create a new mapping.

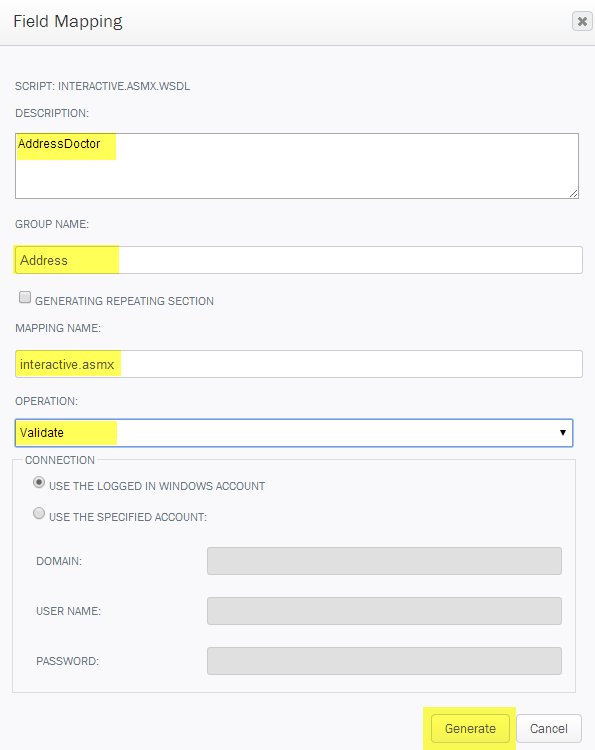
- On the Field Mapping screen, set the following properties:
Description: Type AddressDoctor.
Group Name: Type Address.
Mapping Name (should be automatically filled in): interactive.asmx.
Operation: Click the arrow, and then select Validate from the list.
Connection: Use the currently logged in Windows Account.
Click Generate.
- In the Field Mapping Parameters screen, click Generate Form Fields, and then click OK.

Add a Web Service element to the form
In this section we will add a Web Service element to the form. This Web service will be used with the Address Validation service.
- In Composer, click the Form tab.
- In the Properties pane, click Elements.

- Click Advanced Elements, and then click Web Service.

- Below the View tab, click the WebService element.

- In the Properties pane, set the following properties for the Web Service element:
- Name: (Optional) Type a name for the service (such as AddressDoctor, for example), or you can leave the default name.
- Web Service: Click the arrow, and then select interactive.asmx from the list. (This is the Address doctor service)
- Run: Select (check) Invoked by Rule.
Connect the Web service to address validation button
In this section we will create a rule so that clicking the Validate Address button will trigger the Address Doctor Web service.
- Click the Validate Address button.
- In the Properties pane, next to Rules, click the Options [...] button.
- Click Add, and then Rule Wizard.
- On the Create Rule screen, do the following:
- Label: Click in the field, and then type a label (name) for the rule. For example: CallAddressLookup.
- Type: Click the arrow, and then select Actions from the list.
- Click Add.

On the Add Rule Action screen, do the following:
- Action: Click the arrow, and then select Execute Web Service from the list.
- Web Service Control: Click the arrow, and then select the name of the address Web Service (See Add a Web Service element to the form) added previously.
Note: The name for the Web service (the default name or the name you assign it when you add it) can vary, so select the name from the menu that matches the name you gave the Address Validation Service when you imported it. (See Import and configure a Web service.) See below for an example.

- Click OK.
- On the Create Rule screen, click OK to finish.

Create address validation rules
In this section we will add the second rule to the Validate Address button. This rule sets the address output and maps it to fields in the selectable table. This rule will consist of 6 separate actions--one for each field in the selectable table--that will set the field's value according to the output from the address doctor Web service.
- On the Rules Editor screen, click Add, and then click Rule Wizard.

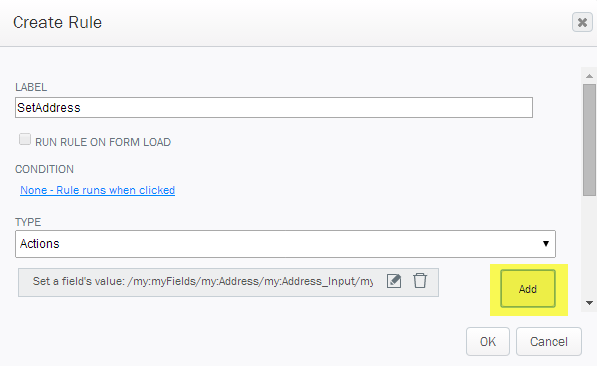
- On the Create Rule screen, set the following options:
- Label: Type SetAddress.
- Type: Click the arrow, and then select Actions from the list.
Click Add.

- On the Add Rule Action screen, set the following properties:
- Action: Click the arrow, and then select Set a Field Value from the list.
- Field: Click the arrow, and then select the Street field (Street_1, for example) from the list.
- Value: Click F(x)
 to insert a formula.

- On the Insert Formula screen, click InsertFieldValue.

- In the Select a Field screen, expand XK01_XML_MAPPING_TXR, and then expand XK01_XML_MAPPING_TXR_INPUT.
- Double-click STREET.

- On the Insert Formula screen, click OK.

- On the Add Rule action screen, click OK.
This will return you to the Create Rule screen.
Create the remaining actions
- Now you need to repeat steps 9-15, creating a new rule but using the following values (Note: The field name may vary slightly depending on your environment or preferences.)
Field
Insert Value
Locality_1
City
PostalCode_1
City_Postal_Code
Province_1
Region__State__Province__County_
Country_1
Country_Key
HouseNumber
House_Number
- When you have finished creating all of the actions for this rule, the Create Rule screen should look something like this:

- Click OK.
- On the Rules Editor screen, click OK to finish.

Set field default values
In this phase, we are going to set some default values for some of the fields in the form. Generally speaking this is largely optional, but it may help streamline the form submission process by defaulting certain fields to the most frequently used values.
For the example form, we will be defaulting some of the Vendor fields to certain values. We will use the Solution pane to manually enter some default values for some of the form fields.
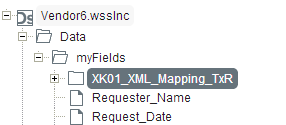
- In Composer, click the Solution tab.

- In the Solution pane, expand Data, MyFields, and then XK01_XML_Mapping_TxR.
- Below XK01_XML_Mapping_TxR, expand address.

- Below address, expand address-input, and then expand Authentication.
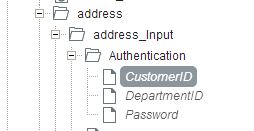
- Right-click CustomerID, and then select Properties.

- In the Edit Field screen, set the following properties (leave others at default values):
Data Type: Click the arrow, and then select Text (string) from the list.
Default Value: 000000
Note: Feel free to substitute example default values for something more appropriate to your form
Repeat the steps above for the following fields, using Text (String) for the Data Type, and the appropriate value for the field as listed in the table below:
|
Field Name |
Values |
|
DepartmentID |
Default Value: 0 |
|
StreetWithHNo |
Default Value: FALSE |
|
CountryofOrigin |
Default Value: COO_USA |
|
CountryType |
Default Value: NAME_EN |
|
LineSeparator |
Default Value: LST_LF |
|
PreferredLanguage |
Default Value: PFL_LANG_ENG |
|
Capitalization |
Default Value: FALSE |
|
FormattedAddressWithOrganization |
Default Value: NO_CHANGE |
|
RemoveDiacritics |
Default Value: FALSE |